
The best concrete patio ideas for a Southern California home start with the finish, not the shape: a broom or salt finish for a plain, grippy slab, exposed aggregate for texture that hides wear, stamped concrete for a stone or brick look, and integral color to take the glare off. A considered shape, a border and a planned joint layout then turn a gray rectangle into something that looks designed. On our published budgeting ranges, broom and salt finishes run $8 to $18 per square foot installed, color or stain $10 to $23, exposed aggregate $11 to $24 and stamped $12 to $26. These are budgeting ranges, not a quote.
Green Design and Build is a licensed residential general contractor (CSLB #1110975) based in Van Nuys. We pour patios, walkways and pool decks across Los Angeles, Orange and Ventura counties and western Riverside and San Bernardino counties, and we install pavers too, so this guide has no reason to push one surface over another. It covers what each finish looks and feels like, the shapes, borders and joints that work, how to handle sun, slip and drainage, and where each idea lands on cost. For the full price breakdown by patio size, see our concrete patio cost guide.
Concrete patio finishes at a glance
The base, forms, reinforcement and pour are the same whatever the top looks like. The finish is what you see and feel every day, and it is where most of the price difference sits.
| Finish | What it looks like | Underfoot | Best for | Watch out for | Installed (per sq ft) |
|---|---|---|---|---|---|
| Broom | Fine parallel ridges in plain gray | Grippy, slightly rough | Budget patios, side yards, walks | Looks utilitarian without a border or color | $8–$18 |
| Salt | Smooth with small scattered pits | Soft texture, decent grip | Pool decks; patios that should look less plain than broom | Pits collect dust and leaves | $8–$18 |
| Color or stain | Color through the slab, or stain on the surface | Same as the texture it is paired with | Cutting glare; matching stucco or roof tile | Dark colors run hotter; stain wears on paths | $10–$23 |
| Exposed aggregate | Pebbles and stone across the surface | Bumpy, very grippy | Hiding dirt and wear; sloped paths | Coarse stone is hard on bare feet; needs sealing | $11–$24 |
| Seeded aggregate | A chosen decorative stone exposed at the surface | Depends on stone size | A stone color you cannot get in a standard mix | Not on our cost guides | Quoted per project |
| Sandblasted | Matte, etched texture, fine to coarse | Even, gritty | Modern homes; softer look than broom | Dust control near the house | Quoted per project |
| Stamped | Slate, flagstone, brick or wood-plank pattern | Smooth patterns can be slick when wet | Large open patios wanting a stone look | Reseal every 2–3 years; repairs never match | $12–$26 |
These are typical Los Angeles budgeting ranges from our concrete contractor page, not a price list or a quote. Your project can come in lower or higher depending on the house, the scope and the finishes; the only real number is a written proposal after a site visit.
Finish ideas: what each one is and who it suits
Broom finish concrete
A broom finish is the standard for exterior concrete. After the slab is floated, the finisher drags a stiff broom across it, leaving fine ridges that give shoes something to grip. It is the cheapest finish and the easiest to repair and match years later, because there is no pattern or color to line up. Two upgrades change it most: a smooth troweled border that frames the slab, and integral color in the mix. On a sloped walk or a step, run the texture across the direction people walk.
Salt finish concrete
A salt finish is made by pressing coarse rock salt into the fresh surface and washing it away once the concrete has hardened. Each grain leaves a small pit, so the slab reads as smooth with a soft, speckled texture. It sits in the same $8 to $18 range as broom on our published guides, which makes it one of the cheapest ways to make a patio look less like a sidewalk, and it is popular around pools because it is kinder to bare feet.
Exposed aggregate concrete
Exposed aggregate is concrete with the top layer of cement paste removed so the stone in the mix shows through, then sealed once cured. On our published ranges it adds $3 to $6 per square foot to standard flatwork, for $11 to $24 installed. It is the most forgiving finish for a working yard: the varied stone hides dirt, leaf stains and tire marks far better than flat gray, and it grips well on a slope. Larger stone is less pleasant barefoot, so many homeowners pair an exposed aggregate field with a smoother border or keep it for walks.
Seeded aggregate
Seeded aggregate is a variation on exposed aggregate. Instead of relying on the stone already in the truck, a decorative stone is broadcast onto the fresh surface, pressed in and then exposed. It is how you get a particular pebble color, a glass blend or a tighter, more even look. It is not a line item on our cost guides, so we price it after a site visit once the stone is chosen.
Sandblasted concrete
Sandblasting is done after the slab has hardened. An abrasive blast etches the surface, from a light pass that only removes the shine to a heavier one that exposes fine aggregate. The result is a flat, matte, even texture that suits modern homes. It needs protection for nearby windows, plants and stucco, and like seeded work it is priced per project.
Stamped concrete
Stamped concrete gets its pattern from mats pressed into the slab while it is still workable, usually with a color hardener and a contrasting release that gives the joints depth. Ashlar slate, random stone, cobble, brick and wood plank are the common patterns. Our stamped concrete cost guide publishes $12 to $26 per square foot installed, with one pattern and one color at the bottom and borders, a second color and hand-tooled joints toward the top. It is the closest concrete gets to stone and asks the most of you afterward: the sealer needs renewing every 2 to 3 years, and a crack or repair through the pattern is never invisible.
Colored concrete: integral color, stain and hardener
- Integral color is mixed into the truck, so the whole slab is colored and a chip shows the same color underneath. It is the most stable option in sun.
- Stain goes on after the slab cures and can give a mottled look, but it lives at the surface and wears along busy paths.
- Color hardener is troweled into the surface of stamped work. It is richer but skin deep, and fades where part of the slab sits in sun and part under a cover.
Color or stain adds $2 to $5 per square foot on our published ranges, for $10 to $23 installed. On a Spanish, Mediterranean or ranch house, a warm buff or sand tone that picks up the stucco or roof tile usually looks better than gray. Ask to see a poured sample outdoors, because a chip under showroom lights never looks the same in Southern California sun.
Shape ideas that make a slab look designed
Most patios are a rectangle off the back door because that is the cheapest form to build. A few layout moves change the result more than any finish:
- Align the slab with the house. Line its edges up with door openings, windows or the corners of the house. A patio that relates to the architecture looks planned even in plain broom.
- Offset rectangles. Two or three overlapping rectangles, one for dining and one for lounging, read as outdoor rooms rather than one big expanse of gray.
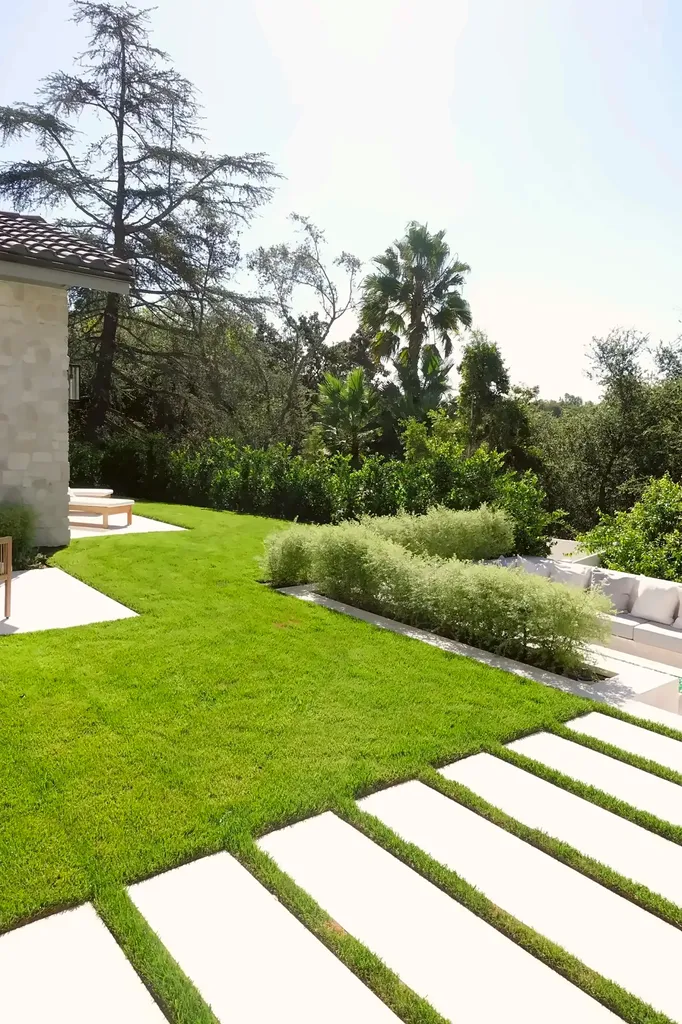
- Large pads with planted joints. Separate pads with a strip of artificial turf, gravel or low groundcover between them soften the look, as in the poolside patio pictured at the top of this page.
- Stepping pads. Individual pads set into lawn, turf or gravel lead to a side gate, fire pit or spa without paving the whole yard.
- Broad curves. A curved edge softens a boxy yard but costs more to form than straight lines. Keep curves broad; tight wiggles look fussy and are hard to joint.
- Levels and steps. Where the back door sits a foot or more above the yard, a landing and wide steps can become a feature. Each step is formed and finished separately, so this is one of the bigger cost drivers.
Size the patio for the furniture you will actually use, with chairs pulled out and room to walk around. Lay it out with a hose or marking paint before anything is formed.
Borders and banding ideas
A border is the cheapest way to make a plain slab look custom:
- Smooth troweled band around a broom or salt field. Almost no added material, just finishing time.
- Contrasting finish, such as an exposed aggregate field with a smooth border. Two finishes on one pour take careful timing.
- Colored band in a darker or warmer tone than the field.
- Paver or brick soldier course around the concrete, which gives a crisp edge against lawn or planting.
- Saw-cut bands that frame the slab or divide it into a grid, and double as control joints.
On stamped work, a border in a second pattern or color pushes the price toward the top of its range, because every pattern change is a hand-finished edge on a slab that is setting while the crew works.
Use the joints as part of the design
Every slab shrinks as it cures and will crack somewhere; control joints tell it where. On a well-designed patio they are part of the pattern.
- Spacing. Our rule of thumb is joint spacing in feet of two to three times the slab thickness in inches, so a 4-inch patio gets joints every 8 to 12 feet, cut about a quarter of the slab depth. Joints too far apart, too shallow or cut too late are where random cracks start.
- Square panels. Keep panels close to square, avoid long narrow strips, and put a joint at inside corners, such as where a patio wraps a planter.
- Line them up with doors, columns and steps so the grid looks intentional.
- Hide them on stamped work in the pattern lines, because a crack across a stone or plank is obvious.
- Isolation joints where the patio meets the house, a pool shell or a post let each move on its own.
A good joint layout does not stop the ground moving. If cracks in an old patio have you wondering about the house, our guide to which foundation cracks are normal and which are not explains how to tell the difference.
Pairing concrete with pavers
You do not have to choose one surface for the whole yard:
- Concrete field, paver border. Most of the area is priced as concrete, with the look of a finished edge.
- Pavers over the utilities. Where a sewer lateral, irrigation main or tree roots run under part of the yard, put pavers there so that area can be lifted and reset, and pour concrete where nothing lies below.
- Paver walkway, concrete patio, or the reverse.
Our paver patio cost guide publishes $15 to $25 or more per square foot installed for standard concrete pavers and $25 to $40 for porcelain, against $8 to $18 for a broom-finished slab. What the extra buys is repairability: a settled paver can be reset invisibly, and a cracked slab stays cracked. These are budgeting ranges, not a quote.
Heat, glare and slip: choosing for Southern California sun
Inland valleys from the San Fernando Valley to the Inland Empire see long, hot summers; coastal patios see more damp mornings and shade.
- Color and heat. Darker surfaces absorb more sunlight and get hotter underfoot. Lighter colors stay more comfortable but show glare and stains, which is why a warm mid-tone is a common compromise.
- Texture and grip. Broom, salt, sandblasted and exposed aggregate all grip well. Smooth troweled concrete and smooth stamped patterns are the ones to avoid where they will be wet.
- Sealer. On stamped work, a solvent-based acrylic gives the wet look; a water-based sealer is flatter and less slippery. Around pools, on steps and on slopes we add grit to the sealer.
- Shade. The surest way to cool a patio is to shade it. If a cover is likely, plan its footings now with your patio cover builder; see our patio cover cost guide and pergola cost guide.
Drainage: the idea nobody photographs
The most important design decision on a patio is where the water goes. The 2025 California Residential Code, in effect since 1 January 2026, requires lots to be graded so surface water drains away from foundation walls, with at least 6 inches of fall in the first 10 feet. Where that is not possible, drains or swales are required, and impervious surfaces within 10 feet of the foundation, such as a concrete patio, must slope at least 2 percent away from the building (CRC Section R401.3). Two percent is roughly a quarter inch per foot.
- Set finished elevations first, so the patio sheds water to a lawn, a planter or a drain that can take it.
- Where the yard cannot take the water, add a channel or area drain to daylight or a dry well. Our published figure is about $90 per linear foot, a budgeting figure rather than a quote.
- Keep downspouts and irrigation spray off the slab edges; it is worth adjusting the landscaping and irrigation around a new patio at the same time.
- On the expansive clay found across much of the San Fernando Valley, thicken the base and moisten the subgrade before the pour, or the corners tend to lift.
A patio that pushes water back toward the house is not a cosmetic problem; it is one of the ways water ends up against a foundation.
Permits for a concrete patio in Los Angeles
A patio at grade usually needs no building permit in the City of Los Angeles. LAMC Section 91.106.2 exempts platforms, walks and driveways not more than 30 inches above grade, and not over a basement or story below. Other cities in our area set their own rules, and we confirm what applies to your address before we quote. The permit questions usually come from what goes with the patio:
- Patio covers and pergolas are not part of that exemption. The only shade structures on the City’s exempt list are canopies or awnings projecting no more than 4 feet from the wall of a house outside Fire District No. 1, so plan on a permit for a patio cover.
- Electrical and gas lines for lighting, a heater or an outdoor kitchen are permitted work, done by licensed specialty contractors we schedule and supervise.
- Retaining walls over 4 feet, or walls holding back a slope or a surcharge, need a permit; our retaining wall ideas guide covers terraced and hillside options.
- The driveway approach and sidewalk in the public right-of-way need a separate Bureau of Engineering A-Permit in the City of Los Angeles (LA Bureau of Engineering). If the driveway is being redone too, see our concrete driveway cost guide.
This is general information, not legal advice; requirements depend on the property and the city.
Plan for what will sit on the patio
- Sleeves and conduit. Run conduit under the slab now for future lighting, a heater, gas or irrigation. Saw-cutting a finished slab later costs far more.
- Footings for a cover. Where a patio cover or pergola post will land, the footing goes in and is inspected before the flatwork.
- Heavier loads. A 4-inch slab over compacted aggregate base handles furniture and a barbecue. For a hot tub, a masonry island or a vehicle we pour 5 to 6 inches with rebar, which our published ranges put at $1 to $3 more per square foot.
- An outdoor kitchen. Plan gas, power, water and drain routes with the slab; our outdoor kitchen cost guide shows how those pieces add up.
The American Concrete Institute’s ACI CODE-332-20, Code Requirements for Residential Concrete, covers cast-in-place concrete for one- and two-family dwellings, including slabs-on-ground, and sets concrete requirements by exposure category. Whatever finish you choose, ask each bidder what mix they are ordering, the slab thickness, the base depth and how the reinforcement is held off the ground.
What each idea costs
On the 500 square foot example in our concrete patio cost guide, a broom finish runs $4,000 to $9,000, exposed aggregate $5,500 to $12,000 and stamped $6,000 to $13,000, against $7,500 to $12,500 in standard pavers. Demolition of an old slab adds $1,500 to $3,000, difficult access $500 to $1,500 or more, and resealing stamped work runs roughly $1 to $3 per square foot every 2 to 3 years. These are typical Los Angeles budgeting ranges, not a price list or a quote; the only real number is a written proposal after a site visit. Seeded aggregate, sandblasting, curves and steps are priced per project.
If the patio is one piece of a larger plan, our backyard remodel cost guide shows how a patio, cover, planting and lighting add up, and our explainer on what hardscaping is puts concrete alongside pavers, walls and outdoor kitchens.
Concrete Patio Ideas FAQs
What is the cheapest concrete patio finish?
Broom and salt finishes are the least expensive, both at $8 to $18 per square foot installed on our published Los Angeles budgeting ranges, because they add no material and little labor beyond the standard pour. A smooth troweled border or integral color are the cheapest ways to dress one up. These are budgeting ranges, not a quote.
What is the difference between broom finish and salt finish concrete?
A broom finish is made by dragging a stiff broom across the fresh surface, leaving fine parallel ridges with good grip. A salt finish is made by pressing rock salt into the fresh surface and washing it out after the concrete hardens, leaving a smoother surface with small pits. Both cost about the same; salt is kinder barefoot, broom grips better on slopes.
Is exposed aggregate concrete good for a patio?
Yes, especially for patios, walks and drives that see heavy use. The exposed stone hides dirt and wear well and grips well, and it adds $3 to $6 per square foot to standard flatwork on our published ranges. Coarse stone is less comfortable barefoot, so many homeowners use a smoother border or a different finish for lounge areas.
What is the best concrete finish around a pool?
One with grip that stays comfortable barefoot: a salt finish, a light sandblast, or a broom finish in a lighter color. For stamped concrete, choose a textured pattern, use a water-based sealer or add grit to the sealer, and avoid smooth slate patterns. Leave an isolation joint at the pool shell and slope the deck away from the coping.
How can I make a plain concrete patio look more expensive?
Add a border, use integral color and plan the joints. A smooth troweled band or a paver soldier course around a broom or salt field, a warm color that picks up the house, and saw-cut joints lined up with doors and corners make a standard slab look designed for little extra cost. Shade, lighting and planting finish the job.
What are the downsides of a concrete patio?
Concrete cracks, and a crack or patch is visible and rarely matches. A slab cannot be lifted and reset like pavers if a root or a pipe underneath needs attention. Dark or smooth finishes can get hot or slippery, and decorative finishes need resealing. A good base, correct joints and drainage reduce the cracking risk; they do not eliminate it.
Do I need a permit for a concrete patio in Los Angeles?
Usually not for a patio at grade. LAMC Section 91.106.2 exempts platforms, walks and driveways not more than 30 inches above grade, and not over a basement or story below, from a building permit in the City of Los Angeles. Patio covers, electrical and gas lines, taller retaining walls and work in the public right-of-way need permits, and other cities set their own rules.
Should I choose concrete or pavers for my patio?
Choose concrete for an open area with nothing underneath it, and pavers where a mature tree, sewer lateral or irrigation main runs below. On our published ranges, a broom-finished slab runs $8 to $18 per square foot and standard pavers $15 to $25 or more, so concrete is cheaper to install while pavers can be lifted and reset invisibly. Many yards use both.
Planning a concrete patio?
We will come out for a free site visit, look at the ground, the drainage, the access and what is already there, show you finish options, and send a written proposal within 48 hours. If pavers or a mix of the two would serve the yard better, the proposal will say so. Browse our outdoor living design ideas, or get in touch.