
Category: Concrete

Explore expert advice on concrete driveways, patios, walkways, slabs, pricing, installation, repairs, and maintenance. Learn what to expect before starting a residential concrete project and how to make informed decisions that last.

  • Driveway Repair, Resurfacing or Replacement: Which Does Your Driveway Need?

    Driveway Repair, Resurfacing or Replacement: Which Does Your Driveway Need?

    Most cracked driveways do not need replacing. A driveway needs repair when the damage is cosmetic or confined: hairline cracks, a crack inside a control joint, a chipped edge. It is a candidate for resurfacing when the slab is flat, sound and well drained but the top has flaked or worn. It needs replacement — of one section or all of it — when the problem is underneath: panels that have sunk or lifted so one side of a crack sits higher than the other, tree roots pushing the slab up, water running toward the garage, or cracks that come back after they are filled. The quickest test is whether the surface is the problem or the symptom. If it is the symptom, a repair or an overlay only hides it until the next rainy season.

    We are Green Design and Build, a licensed residential general contractor based in Van Nuys (CSLB #1110975), working across Los Angeles, Orange and Ventura counties and western Riverside and San Bernardino counties. To be clear up front: we replace driveways — failed sections or the whole driveway — and we do not do crack sealing, patching or resurfacing. Those are smaller jobs that concrete repair, slab-lifting and paving companies do well, and this guide says when one of them is the right call. There are no prices here on purpose: driveway numbers depend on the slab, the soil, the access and the apron, and the only honest figure comes from a site visit.

    Repair, resurfacing or replacement: the short version

    The three words get used loosely. Here is what each means on a concrete driveway, and who usually does it.

    OptionWhat it involvesWorks whenFails whenUsually done by
    Crack sealing and patchingFilling cleaned-out cracks with flexible sealant; patching chips and small holesHairline cracks, joint cracks, small spalls on a level slabOne side of the crack is higher, or the crack is still movingHandyman or concrete repair company
    Slab liftingPumping grout (mudjacking) or expanding foam under a sunken panelA panel that dropped in one pieceBroken or root-heaved panels; water still washing out the baseConcrete leveling company
    ResurfacingA thin bonded cement-based overlay on the existing slabSound, level, well-drained slab with a worn or scaled topSlab cracked through, uneven or movingResurfacing or decorative concrete contractor
    Section replacementSaw-cutting out panels at the joints, fixing the base, pouring newDamage confined to a few panels; drainage worksThe base or the slope is wrong across the whole drivewayGeneral or concrete contractor — work we do
    Full replacementRemoving the whole slab, rebuilding the base, regrading, new concrete or paversWidespread failure, wrong drainage, a new size, layout or materialRarely the wrong answer when the base has failed — just the most involvedGeneral or concrete contractor — work we do

    Our driveway replacement service in Los Angeles covers the last two rows. If your driveway fits the first three, a specialist is the right call, and we would rather tell you that than sell you a slab you do not need.

    Is the problem the surface or what is under it?

    A concrete driveway is a thin slab — typically four inches for cars — on compacted soil and crushed aggregate base. It cannot span a hole, so when the ground under it settles, swells or washes out, the slab cracks to follow. Surface problems (shrinkage cracks, flaking, worn finish, chips) leave the base fine, and repair or resurfacing works. Support problems (settled fill, expansive clay, roots, a leaking line, years of water under the slab) come back after a surface fix because nothing touched the cause.

    Three questions sort most driveways. Is the surface still in one plane, or can you feel a lip with your foot? Has the crack changed since last year? Where does the water go when it rains? If the answers are “flat, no change, toward the street,” it is a surface repair. If any answer goes the other way, keep reading.

    Reading the cracks

    Concrete cracks; the straight control joints cut across a driveway exist so it cracks where you want it to. What a crack looks like tells you what caused it.

    Hairline cracks and cracks inside joints

    Fine, wandering cracks, often appearing in the first year, are usually shrinkage from curing; a crack inside a control joint is the joint doing its job. If both sides are level and nothing is growing, it is cosmetic. Seal it to keep water out of the base.

    A crack where one side sits higher

    This is the one that matters. A vertical offset means the two pieces are no longer supported the same way: one has settled or the other has been pushed up. Sealant cannot level it, and grinding the lip removes the trip hazard, not the movement. An intact panel that dropped may be liftable; a broken, root-heaved or washed-out one needs to come out.

    A crack that keeps widening or reopening

    Continuing movement is a support problem by definition. Mark both ends of the crack in pencil with the date and look again after the rainy season. If it has grown or the filler has torn, resealing buys a season at most.

    Corner breaks and crumbling edges

    A broken corner or an edge crumbling where tires run off the slab usually means the edge was never supported properly. One corner can be patched or cut out; edges failing all along the driveway point to how it was built, and that tends to be a replacement conversation.

    Cracks near the house

    A driveway crack is not a foundation crack, but they share causes. If the garage slab or the house is cracking too, read our guides to which foundation cracks are normal and which are not and the warning signs a foundation needs repair before deciding anything about the driveway.

    What you seeLikely causeUsual answer
    Fine random cracks, slab levelShrinkage during curingSeal or leave
    Crack inside a control jointNormal shrinkage at the jointSeal the joint
    One side of the crack higherSettlement or heave under the slabLift the panel if intact; otherwise replace the section
    Crack growing or reopeningOngoing movement, often water or rootsFind the cause; section or full replacement
    Slab tented up near a treeRoot heaveRoot work plus section replacement, or pavers
    Flaking, pitted or worn topScaling, spalling or wearResurface if the slab is sound
    Water ponding or flowing to the garageWrong slope or settled panelsRegrade — usually replacement

    Settling and sinking panels

    A sunken panel usually sits on soil that was never compacted properly or on base that water has been washing out. In older Los Angeles neighborhoods that often means a driveway poured over backfill against the garage, over a sewer-lateral trench, or over fill placed when the lot was graded decades ago.

    If the panel dropped in one piece, slab lifting is a legitimate repair: mudjacking pumps cement-based grout under the slab through drilled holes, and foam lifting uses expanding polyurethane. Neither changes the soil that let it sink, so a panel sinking because a downspout empties against it will sink again until the water is redirected. When the sunken area is broken, several panels have gone, or the low spot collects water every storm, replacing the section on a new compacted base is the permanent fix.

    Heaving from tree roots

    Roots lift a slab from below until it tents up and cracks along the crest, often taking the apron and sidewalk with it. No surface repair helps: the panel comes out, the root is dealt with, and the section is rebuilt. How depends on whose tree it is:

    • A tree on your property: have an arborist assess it before anyone cuts. Cutting a major root can destabilize a tree, and a root barrier is often better than heavy pruning.
    • A City street tree: in the City of Los Angeles, removing, pruning or trimming the roots of a street tree may require a separate permit from the Bureau of Street Services’ Urban Forestry Division, according to the Bureau of Engineering permit manual. Sort that out before the saw comes out.

    Where a tree will keep growing beside the slab, we often suggest pavers for the replacement: a paver section can be lifted along a root or utility trench and relaid with the same units, where concrete can only be cut and patched. The paver driveway and side yard we built in Anaheim shows that construction from excavation to drains at the low points, and our paver installation page covers the base a driveway needs.

    Drainage problems a repair cannot fix

    Look at the driveway during or right after rain. Water should run away from the garage and the house toward the street or a drain. If it ponds, runs back toward the garage or disappears into a crack, the base is getting wet every storm.

    Section R401.3 of the 2025 California Residential Code requires lots to be graded so surface water drains away from foundation walls, with at least 6 inches of fall in the first 10 feet; where lot lines or other barriers prevent that, impervious surfaces within 10 feet of the foundation must slope at least 2 percent away from the building, with drains or swales to carry the water. A driveway that has settled toward the garage, or was poured flat, works against that.

    Slope is set when the base is built, so sealant and overlays cannot change it. Correcting it means removing the affected area, regrading and pouring at the right fall, sometimes with a trench drain at the garage where it sits below the street. It is the most common reason a driveway that looks merely cracked needs replacing.

    Spalling, scaling and what resurfacing can do

    Scaling is the top layer flaking off in thin sheets; spalling is deeper, with pieces popping out of the surface, sometimes over reinforcement set too close to the top. In Southern California these tend to trace to a finish that was overworked or wetted during placement, a surface that dried too fast in summer heat, or years of water and chemicals. They are what resurfacing is for: bonding a thin layer of a cement-based product over the cleaned and prepared slab. On a sound, level, well-drained slab it renews the surface with far less disruption than tear-out. Its limits:

    • It copies the slab beneath. A moving crack reflects through the overlay, usually along the same line.
    • It cannot change the slope. Water that ran the wrong way still runs the wrong way.
    • It only lasts if it bonds. Oil, old sealers or a weak, dusty top have to be cleaned or ground off first.
    • It adds height at the garage door and where the driveway meets the apron and sidewalk.

    Pouring a full new slab over the old one is a different idea, and one we steer people away from: it raises the driveway above the garage slab and apron, cracks where the old slab is cracked, and leaves the failed base underneath. Our driveway replacement cost guide explains why tear-out and a new compacted base is the better spend once a driveway has failed.

    Asphalt driveways: same logic, different vocabulary

    Asphalt follows the same rule — treat the surface if the surface is the problem, rebuild if the base is. Sealcoating protects an oxidizing, graying surface and is maintenance, not a structural fix. Crack filling keeps water out of isolated cracks, patching replaces a pothole or soft spot, and an overlay adds a new layer of asphalt over a sound base with a worn-out surface. Replacement removes the asphalt and rebuilds the base.

    Interconnected cracking that looks like reptile scales — alligator cracking — and ruts or soft spots that deform under tires generally point to the base, which is when an overlay stops making sense. We do not install or repair asphalt; paving contractors do. Where we come in is when the decision is to take the asphalt out and replace it with concrete or pavers.

    Section replacement or full replacement?

    There is no fixed percentage that tips a driveway from partial to full replacement. These are what we weigh on site:

    • Is the damage confined? One or two root-heaved panels with the rest level and sound is a good case for cutting out sections at the joints.
    • Is the base sound elsewhere? If the cause runs under the whole driveway, replacing two panels just schedules the next two.
    • Does the slope work? A new section has to meet the grades around it, so changing the fall usually means a larger replacement.
    • Will it match? New concrete will not match years of weathering — often acceptable on broom finish, rarely on stamped or colored concrete.
    • Are you changing anything? A wider driveway, a new material or a conversion from asphalt is a full replacement.
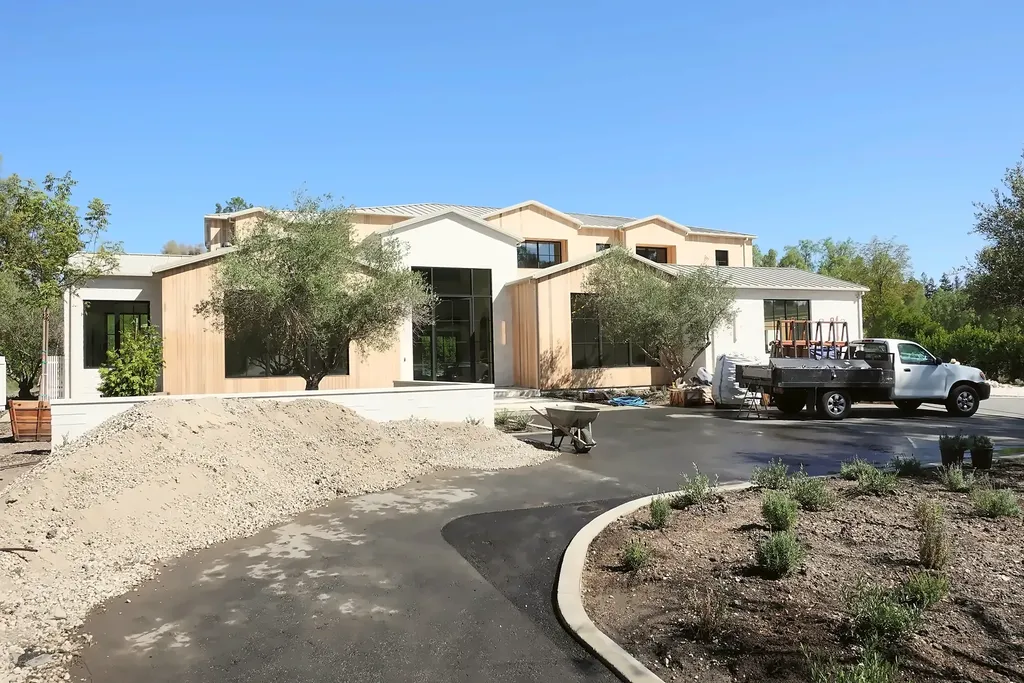
    A Hidden Hills driveway and motor court during construction, before paving
    A driveway and motor court mid-construction on a Green Design and Build project in Hidden Hills.

    A section replacement is not a lesser job: saw-cut at clean lines, base excavated, compacted and corrected, and the new panel formed to meet the old slab at the right height and fall. Our concrete construction page describes how we build that base and slab, which is where most driveway failures start.

    The apron, the sidewalk and the city permit

    The driveway approach — the apron between sidewalk and street, the curb cut and the sidewalk crossing — is not part of your lot. It sits in the public right-of-way. In the City of Los Angeles:

    • It needs an A-Permit from the Bureau of Engineering. The Bureau’s permit manual defines A-Permits as covering the repair, construction or reconstruction of curbs, sidewalks, driveway approaches or gutters, says the applicant is generally the property owner or their representative, and requires the work to follow the Greenbook standard specifications.
    • It is built to the City’s design. The driveway construction, modification or replacement procedure points standard driveways to City Standard Plan S-440-4, and its sample permit conditions direct the applicant to call the Bureau of Contract Administration for a pre-inspection.
    • Avenues and Boulevards need LADOT first. An approved LADOT Driveway Approach Data Sheet is required before the permit is issued.
    • Abandoned driveways get closed. Old curb cuts must be replaced with full-height curb and sidewalk, so moving a driveway means closing the old one.

    Who pays for a cracked apron? The City’s sidewalk rebate program reimburses eligible owners for part of the cost of repairs that bring a non-compliant sidewalk up to ADA requirements. Its rebate program FAQ includes the apron only if it must be altered to make the sidewalk compliant — not where the apron is damaged but the sidewalk is fine — and says the applicant hires a licensed contractor of their choosing. As of October 2026 the program’s page says new applications go on a waitlist.

    Other cities — Burbank, Glendale, Pasadena, Long Beach and those across Orange, Ventura, Riverside and San Bernardino counties — run their own encroachment or public works permits with their own standard drawings. We confirm the rules with the city before pricing an apron, and if the cracked apron needs replacing anyway, the driveway job is the time to do it.

    Do you need a permit for the driveway itself?

    Usually not, for the part on your property. Los Angeles Municipal Code section 91.106.2 exempts from building permits platforms, walks and driveways not more than 30 inches above grade and not over any basement or story below. That covers ordinary replacement on a typical lot. It does not cover the apron, a raised driveway structure, or work that rides along, such as a retaining wall to widen a driveway on a slope. Other cities set their own exemptions. If widening means cutting into a slope, our guide to retaining walls for sloped and hillside lots explains when a wall needs a permit and engineering, and our retaining wall construction page shows how we build them.

    What drives the price of a driveway replacement

    Two driveways the same size can differ a great deal in what it takes to replace them. Roughly in order of impact:

    1. The old slab: area, thickness, reinforcement, and whether a newer driveway was poured over an older one.
    2. What is under it: a sound base needs correcting; soft fill, expansive clay or a washed-out base needs excavation and new base compacted in lifts.
    3. Drainage: regrading, a trench drain at the garage, or a line to the curb.
    4. Access for a machine and a concrete truck.
    5. The apron: the permit, the City-standard approach, inspections and sometimes sidewalk panels.
    6. Trees: arborist input, root barriers and any street-tree permit.
    7. Surface: broom-finish, exposed aggregate, stamped or colored concrete, or pavers.
    8. Loading: a slab for an RV, boat trailer or work truck is built thicker with more reinforcement.

    For published budgeting ranges, see what a driveway replacement costs in Los Angeles and how much a new concrete driveway costs; if you are considering a decorative finish, read stamped concrete cost first. Your actual number comes from the site visit.

    Timing: when to repair or replace

    • Fix trip hazards now, whatever the season.
    • Seal open cracks before the rains; winter water in cracks turns surface problems into base problems.
    • Watch a suspicious crack through one rainy season before committing to a big job, unless it is a hazard.
    • Plan around heat. Inland and in the Valley, summer pours start at first light so the surface does not dry too fast.
    • Plan around parking. A concrete replacement is typically 3 to 7 days on site. You can walk on it after about 24 hours, drive a car on it after 7 days, and keep RVs, boats and loaded trucks off until the 28-day cure. Pavers can usually take a car the day after the joints are sanded and compacted.
    • Sleeve it first. If irrigation, lighting or EV charger conduit will ever cross the driveway, the replacement is the time to lay a sleeve.
    • Bundle the hardscape. Driveways are often redone with walkways, side yards and patios — see what hardscaping includes, our concrete patio ideas, and the paver patio cost guide.

    Driveway Repair FAQs

    What is the cheapest way to fix a cracked driveway?

    For hairline and joint cracks on a level slab, filling them with flexible concrete crack sealant is the least expensive fix and often all the driveway needs. It stops being cheap when one side of the crack is higher or it keeps reopening, because sealing a moving crack has to be repeated while the cause gets worse.

    Can a broken driveway be repaired, or does it have to be replaced?

    Surface damage and stable cracks can usually be repaired, and a panel that sank in one piece can sometimes be lifted. A driveway that is broken up, root-heaved, sunk in several places or draining toward the house needs the affected sections replaced, sometimes the whole slab.

    Is driveway resurfacing worth it?

    Yes, on a concrete driveway that is sound, level and well drained but has a scaled, spalled or worn surface. No, on a cracked, uneven or moving slab, because old cracks reflect through the overlay and it cannot change the slope.

    Will homeowners insurance cover driveway repair?

    It depends on your policy and on what caused the damage, so the reliable answer comes from your insurer or agent; this is general information, not insurance advice. Gradual wear, settlement and root damage are different situations from a sudden event, and policies treat them differently.

    Who is responsible for the driveway apron in Los Angeles?

    The apron is in the public right-of-way, and repairing or replacing it in the City of Los Angeles requires a Bureau of Engineering A-Permit, generally applied for by the property owner or their representative. The City’s sidewalk rebate program includes an apron only when it must be altered to make the sidewalk ADA compliant, not when only the apron is damaged.

    Do I need a permit to repair or replace my driveway in Los Angeles?

    The driveway on your own property generally does not: LAMC 91.106.2 exempts driveways not more than 30 inches above grade and not over a basement or story below. The apron, curb cut and sidewalk crossing need a Bureau of Engineering A-Permit, and other cities have their own encroachment permits.

    Can tree roots under a driveway be cut?

    Sometimes, but have an arborist assess the tree first, because cutting large roots can destabilize it. For a City street tree in the parkway, root pruning may require a permit from the Bureau of Street Services’ Urban Forestry Division. A root barrier, or pavers that can be lifted and relaid, is often a better long-term answer than repeated cutting.

    Does Green Design and Build repair driveway cracks or resurface driveways?

    No. We replace driveways — failed sections or the whole driveway, in concrete or pavers — including the City apron permit when the approach is part of the job. Crack sealing, patching, slab lifting and resurfacing are smaller jobs specialist companies handle well, and if that is all your driveway needs, we will tell you so at the site visit.

    Get a straight answer on your driveway

    If your driveway is sinking, lifting, breaking up or sending water toward the garage, we will look at the slab, the base, the slope and the apron and tell you plainly whether it needs a specialist repair or a replacement. Site visits take about two hours, and if it needs replacing you will have a written proposal within 48 hours listing demolition, base, the new surface and any permit work separately. Request a site visit through our contact page or call us.

  • Concrete Patio Ideas: Finishes, Shapes and Borders for Southern California Homes

    Concrete Patio Ideas: Finishes, Shapes and Borders for Southern California Homes

    The best concrete patio ideas for a Southern California home start with the finish, not the shape: a broom or salt finish for a plain, grippy slab, exposed aggregate for texture that hides wear, stamped concrete for a stone or brick look, and integral color to take the glare off. A considered shape, a border and a planned joint layout then turn a gray rectangle into something that looks designed. On our published budgeting ranges, broom and salt finishes run $8 to $18 per square foot installed, color or stain $10 to $23, exposed aggregate $11 to $24 and stamped $12 to $26. These are budgeting ranges, not a quote.

    Green Design and Build is a licensed residential general contractor (CSLB #1110975) based in Van Nuys. We pour patios, walkways and pool decks across Los Angeles, Orange and Ventura counties and western Riverside and San Bernardino counties, and we install pavers too, so this guide has no reason to push one surface over another. It covers what each finish looks and feels like, the shapes, borders and joints that work, how to handle sun, slip and drainage, and where each idea lands on cost. For the full price breakdown by patio size, see our concrete patio cost guide.

    Concrete patio finishes at a glance

    The base, forms, reinforcement and pour are the same whatever the top looks like. The finish is what you see and feel every day, and it is where most of the price difference sits.

    FinishWhat it looks likeUnderfootBest forWatch out forInstalled (per sq ft)
    BroomFine parallel ridges in plain grayGrippy, slightly roughBudget patios, side yards, walksLooks utilitarian without a border or color$8–$18
    SaltSmooth with small scattered pitsSoft texture, decent gripPool decks; patios that should look less plain than broomPits collect dust and leaves$8–$18
    Color or stainColor through the slab, or stain on the surfaceSame as the texture it is paired withCutting glare; matching stucco or roof tileDark colors run hotter; stain wears on paths$10–$23
    Exposed aggregatePebbles and stone across the surfaceBumpy, very grippyHiding dirt and wear; sloped pathsCoarse stone is hard on bare feet; needs sealing$11–$24
    Seeded aggregateA chosen decorative stone exposed at the surfaceDepends on stone sizeA stone color you cannot get in a standard mixNot on our cost guidesQuoted per project
    SandblastedMatte, etched texture, fine to coarseEven, grittyModern homes; softer look than broomDust control near the houseQuoted per project
    StampedSlate, flagstone, brick or wood-plank patternSmooth patterns can be slick when wetLarge open patios wanting a stone lookReseal every 2–3 years; repairs never match$12–$26

    These are typical Los Angeles budgeting ranges from our concrete contractor page, not a price list or a quote. Your project can come in lower or higher depending on the house, the scope and the finishes; the only real number is a written proposal after a site visit.

    Finish ideas: what each one is and who it suits

    Broom finish concrete

    A broom finish is the standard for exterior concrete. After the slab is floated, the finisher drags a stiff broom across it, leaving fine ridges that give shoes something to grip. It is the cheapest finish and the easiest to repair and match years later, because there is no pattern or color to line up. Two upgrades change it most: a smooth troweled border that frames the slab, and integral color in the mix. On a sloped walk or a step, run the texture across the direction people walk.

    Salt finish concrete

    A salt finish is made by pressing coarse rock salt into the fresh surface and washing it away once the concrete has hardened. Each grain leaves a small pit, so the slab reads as smooth with a soft, speckled texture. It sits in the same $8 to $18 range as broom on our published guides, which makes it one of the cheapest ways to make a patio look less like a sidewalk, and it is popular around pools because it is kinder to bare feet.

    Exposed aggregate concrete

    Exposed aggregate is concrete with the top layer of cement paste removed so the stone in the mix shows through, then sealed once cured. On our published ranges it adds $3 to $6 per square foot to standard flatwork, for $11 to $24 installed. It is the most forgiving finish for a working yard: the varied stone hides dirt, leaf stains and tire marks far better than flat gray, and it grips well on a slope. Larger stone is less pleasant barefoot, so many homeowners pair an exposed aggregate field with a smoother border or keep it for walks.

    Seeded aggregate

    Seeded aggregate is a variation on exposed aggregate. Instead of relying on the stone already in the truck, a decorative stone is broadcast onto the fresh surface, pressed in and then exposed. It is how you get a particular pebble color, a glass blend or a tighter, more even look. It is not a line item on our cost guides, so we price it after a site visit once the stone is chosen.

    Sandblasted concrete

    Sandblasting is done after the slab has hardened. An abrasive blast etches the surface, from a light pass that only removes the shine to a heavier one that exposes fine aggregate. The result is a flat, matte, even texture that suits modern homes. It needs protection for nearby windows, plants and stucco, and like seeded work it is priced per project.

    Stamped concrete

    Stamped concrete gets its pattern from mats pressed into the slab while it is still workable, usually with a color hardener and a contrasting release that gives the joints depth. Ashlar slate, random stone, cobble, brick and wood plank are the common patterns. Our stamped concrete cost guide publishes $12 to $26 per square foot installed, with one pattern and one color at the bottom and borders, a second color and hand-tooled joints toward the top. It is the closest concrete gets to stone and asks the most of you afterward: the sealer needs renewing every 2 to 3 years, and a crack or repair through the pattern is never invisible.

    Colored concrete: integral color, stain and hardener

    • Integral color is mixed into the truck, so the whole slab is colored and a chip shows the same color underneath. It is the most stable option in sun.
    • Stain goes on after the slab cures and can give a mottled look, but it lives at the surface and wears along busy paths.
    • Color hardener is troweled into the surface of stamped work. It is richer but skin deep, and fades where part of the slab sits in sun and part under a cover.

    Color or stain adds $2 to $5 per square foot on our published ranges, for $10 to $23 installed. On a Spanish, Mediterranean or ranch house, a warm buff or sand tone that picks up the stucco or roof tile usually looks better than gray. Ask to see a poured sample outdoors, because a chip under showroom lights never looks the same in Southern California sun.

    Shape ideas that make a slab look designed

    Most patios are a rectangle off the back door because that is the cheapest form to build. A few layout moves change the result more than any finish:

    • Align the slab with the house. Line its edges up with door openings, windows or the corners of the house. A patio that relates to the architecture looks planned even in plain broom.
    • Offset rectangles. Two or three overlapping rectangles, one for dining and one for lounging, read as outdoor rooms rather than one big expanse of gray.
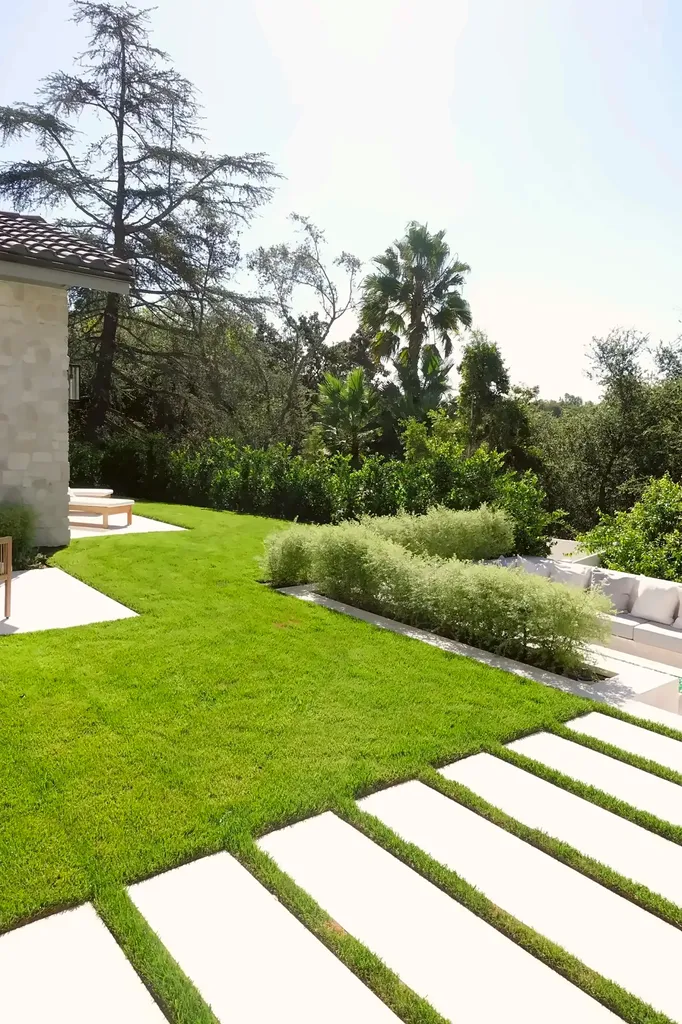
    • Large pads with planted joints. Separate pads with a strip of artificial turf, gravel or low groundcover between them soften the look, as in the poolside patio pictured at the top of this page.
    • Stepping pads. Individual pads set into lawn, turf or gravel lead to a side gate, fire pit or spa without paving the whole yard.
    • Broad curves. A curved edge softens a boxy yard but costs more to form than straight lines. Keep curves broad; tight wiggles look fussy and are hard to joint.
    • Levels and steps. Where the back door sits a foot or more above the yard, a landing and wide steps can become a feature. Each step is formed and finished separately, so this is one of the bigger cost drivers.
    Artificial turf lawn with inset concrete step pads in a Hidden Hills backyard
    Concrete step pads set into turf: a path without paving the whole yard.

    Size the patio for the furniture you will actually use, with chairs pulled out and room to walk around. Lay it out with a hose or marking paint before anything is formed.

    Borders and banding ideas

    A border is the cheapest way to make a plain slab look custom:

    • Smooth troweled band around a broom or salt field. Almost no added material, just finishing time.
    • Contrasting finish, such as an exposed aggregate field with a smooth border. Two finishes on one pour take careful timing.
    • Colored band in a darker or warmer tone than the field.
    • Paver or brick soldier course around the concrete, which gives a crisp edge against lawn or planting.
    • Saw-cut bands that frame the slab or divide it into a grid, and double as control joints.

    On stamped work, a border in a second pattern or color pushes the price toward the top of its range, because every pattern change is a hand-finished edge on a slab that is setting while the crew works.

    Use the joints as part of the design

    Every slab shrinks as it cures and will crack somewhere; control joints tell it where. On a well-designed patio they are part of the pattern.

    • Spacing. Our rule of thumb is joint spacing in feet of two to three times the slab thickness in inches, so a 4-inch patio gets joints every 8 to 12 feet, cut about a quarter of the slab depth. Joints too far apart, too shallow or cut too late are where random cracks start.
    • Square panels. Keep panels close to square, avoid long narrow strips, and put a joint at inside corners, such as where a patio wraps a planter.
    • Line them up with doors, columns and steps so the grid looks intentional.
    • Hide them on stamped work in the pattern lines, because a crack across a stone or plank is obvious.
    • Isolation joints where the patio meets the house, a pool shell or a post let each move on its own.

    A good joint layout does not stop the ground moving. If cracks in an old patio have you wondering about the house, our guide to which foundation cracks are normal and which are not explains how to tell the difference.

    Pairing concrete with pavers

    You do not have to choose one surface for the whole yard:

    • Concrete field, paver border. Most of the area is priced as concrete, with the look of a finished edge.
    • Pavers over the utilities. Where a sewer lateral, irrigation main or tree roots run under part of the yard, put pavers there so that area can be lifted and reset, and pour concrete where nothing lies below.
    • Paver walkway, concrete patio, or the reverse.

    Our paver patio cost guide publishes $15 to $25 or more per square foot installed for standard concrete pavers and $25 to $40 for porcelain, against $8 to $18 for a broom-finished slab. What the extra buys is repairability: a settled paver can be reset invisibly, and a cracked slab stays cracked. These are budgeting ranges, not a quote.

    Heat, glare and slip: choosing for Southern California sun

    Inland valleys from the San Fernando Valley to the Inland Empire see long, hot summers; coastal patios see more damp mornings and shade.

    • Color and heat. Darker surfaces absorb more sunlight and get hotter underfoot. Lighter colors stay more comfortable but show glare and stains, which is why a warm mid-tone is a common compromise.
    • Texture and grip. Broom, salt, sandblasted and exposed aggregate all grip well. Smooth troweled concrete and smooth stamped patterns are the ones to avoid where they will be wet.
    • Sealer. On stamped work, a solvent-based acrylic gives the wet look; a water-based sealer is flatter and less slippery. Around pools, on steps and on slopes we add grit to the sealer.
    • Shade. The surest way to cool a patio is to shade it. If a cover is likely, plan its footings now with your patio cover builder; see our patio cover cost guide and pergola cost guide.

    Drainage: the idea nobody photographs

    The most important design decision on a patio is where the water goes. The 2025 California Residential Code, in effect since 1 January 2026, requires lots to be graded so surface water drains away from foundation walls, with at least 6 inches of fall in the first 10 feet. Where that is not possible, drains or swales are required, and impervious surfaces within 10 feet of the foundation, such as a concrete patio, must slope at least 2 percent away from the building (CRC Section R401.3). Two percent is roughly a quarter inch per foot.

    1. Set finished elevations first, so the patio sheds water to a lawn, a planter or a drain that can take it.
    2. Where the yard cannot take the water, add a channel or area drain to daylight or a dry well. Our published figure is about $90 per linear foot, a budgeting figure rather than a quote.
    3. Keep downspouts and irrigation spray off the slab edges; it is worth adjusting the landscaping and irrigation around a new patio at the same time.
    4. On the expansive clay found across much of the San Fernando Valley, thicken the base and moisten the subgrade before the pour, or the corners tend to lift.

    A patio that pushes water back toward the house is not a cosmetic problem; it is one of the ways water ends up against a foundation.

    Permits for a concrete patio in Los Angeles

    A patio at grade usually needs no building permit in the City of Los Angeles. LAMC Section 91.106.2 exempts platforms, walks and driveways not more than 30 inches above grade, and not over a basement or story below. Other cities in our area set their own rules, and we confirm what applies to your address before we quote. The permit questions usually come from what goes with the patio:

    • Patio covers and pergolas are not part of that exemption. The only shade structures on the City’s exempt list are canopies or awnings projecting no more than 4 feet from the wall of a house outside Fire District No. 1, so plan on a permit for a patio cover.
    • Electrical and gas lines for lighting, a heater or an outdoor kitchen are permitted work, done by licensed specialty contractors we schedule and supervise.
    • Retaining walls over 4 feet, or walls holding back a slope or a surcharge, need a permit; our retaining wall ideas guide covers terraced and hillside options.
    • The driveway approach and sidewalk in the public right-of-way need a separate Bureau of Engineering A-Permit in the City of Los Angeles (LA Bureau of Engineering). If the driveway is being redone too, see our concrete driveway cost guide.

    This is general information, not legal advice; requirements depend on the property and the city.

    Plan for what will sit on the patio

    • Sleeves and conduit. Run conduit under the slab now for future lighting, a heater, gas or irrigation. Saw-cutting a finished slab later costs far more.
    • Footings for a cover. Where a patio cover or pergola post will land, the footing goes in and is inspected before the flatwork.
    • Heavier loads. A 4-inch slab over compacted aggregate base handles furniture and a barbecue. For a hot tub, a masonry island or a vehicle we pour 5 to 6 inches with rebar, which our published ranges put at $1 to $3 more per square foot.
    • An outdoor kitchen. Plan gas, power, water and drain routes with the slab; our outdoor kitchen cost guide shows how those pieces add up.

    The American Concrete Institute’s ACI CODE-332-20, Code Requirements for Residential Concrete, covers cast-in-place concrete for one- and two-family dwellings, including slabs-on-ground, and sets concrete requirements by exposure category. Whatever finish you choose, ask each bidder what mix they are ordering, the slab thickness, the base depth and how the reinforcement is held off the ground.

    What each idea costs

    On the 500 square foot example in our concrete patio cost guide, a broom finish runs $4,000 to $9,000, exposed aggregate $5,500 to $12,000 and stamped $6,000 to $13,000, against $7,500 to $12,500 in standard pavers. Demolition of an old slab adds $1,500 to $3,000, difficult access $500 to $1,500 or more, and resealing stamped work runs roughly $1 to $3 per square foot every 2 to 3 years. These are typical Los Angeles budgeting ranges, not a price list or a quote; the only real number is a written proposal after a site visit. Seeded aggregate, sandblasting, curves and steps are priced per project.

    If the patio is one piece of a larger plan, our backyard remodel cost guide shows how a patio, cover, planting and lighting add up, and our explainer on what hardscaping is puts concrete alongside pavers, walls and outdoor kitchens.

    Concrete Patio Ideas FAQs

    What is the cheapest concrete patio finish?

    Broom and salt finishes are the least expensive, both at $8 to $18 per square foot installed on our published Los Angeles budgeting ranges, because they add no material and little labor beyond the standard pour. A smooth troweled border or integral color are the cheapest ways to dress one up. These are budgeting ranges, not a quote.

    What is the difference between broom finish and salt finish concrete?

    A broom finish is made by dragging a stiff broom across the fresh surface, leaving fine parallel ridges with good grip. A salt finish is made by pressing rock salt into the fresh surface and washing it out after the concrete hardens, leaving a smoother surface with small pits. Both cost about the same; salt is kinder barefoot, broom grips better on slopes.

    Is exposed aggregate concrete good for a patio?

    Yes, especially for patios, walks and drives that see heavy use. The exposed stone hides dirt and wear well and grips well, and it adds $3 to $6 per square foot to standard flatwork on our published ranges. Coarse stone is less comfortable barefoot, so many homeowners use a smoother border or a different finish for lounge areas.

    What is the best concrete finish around a pool?

    One with grip that stays comfortable barefoot: a salt finish, a light sandblast, or a broom finish in a lighter color. For stamped concrete, choose a textured pattern, use a water-based sealer or add grit to the sealer, and avoid smooth slate patterns. Leave an isolation joint at the pool shell and slope the deck away from the coping.

    How can I make a plain concrete patio look more expensive?

    Add a border, use integral color and plan the joints. A smooth troweled band or a paver soldier course around a broom or salt field, a warm color that picks up the house, and saw-cut joints lined up with doors and corners make a standard slab look designed for little extra cost. Shade, lighting and planting finish the job.

    What are the downsides of a concrete patio?

    Concrete cracks, and a crack or patch is visible and rarely matches. A slab cannot be lifted and reset like pavers if a root or a pipe underneath needs attention. Dark or smooth finishes can get hot or slippery, and decorative finishes need resealing. A good base, correct joints and drainage reduce the cracking risk; they do not eliminate it.

    Do I need a permit for a concrete patio in Los Angeles?

    Usually not for a patio at grade. LAMC Section 91.106.2 exempts platforms, walks and driveways not more than 30 inches above grade, and not over a basement or story below, from a building permit in the City of Los Angeles. Patio covers, electrical and gas lines, taller retaining walls and work in the public right-of-way need permits, and other cities set their own rules.

    Should I choose concrete or pavers for my patio?

    Choose concrete for an open area with nothing underneath it, and pavers where a mature tree, sewer lateral or irrigation main runs below. On our published ranges, a broom-finished slab runs $8 to $18 per square foot and standard pavers $15 to $25 or more, so concrete is cheaper to install while pavers can be lifted and reset invisibly. Many yards use both.

    Planning a concrete patio?

    We will come out for a free site visit, look at the ground, the drainage, the access and what is already there, show you finish options, and send a written proposal within 48 hours. If pavers or a mix of the two would serve the yard better, the proposal will say so. Browse our outdoor living design ideas, or get in touch.

Call Free Estimate