
Category: Painting

Expert advice on exterior and interior painting — from prep and materials to hiring the right contractor and avoiding common mistakes that lead to early paint failure.

  • Popcorn Ceiling Removal in Los Angeles: The Asbestos Question, the Process and Your Options

    Popcorn Ceiling Removal in Los Angeles: The Asbestos Question, the Process and Your Options

    Yes, a popcorn ceiling can be removed and replaced with a smooth, painted finish, but in a Los Angeles home the first step is a lab test for asbestos, not a scraper. You cannot tell by looking, and the risk comes from disturbing the texture, which is exactly what scraping does. If the samples come back clean, removal is a dusty but straightforward finish job: contain the room, wet the texture, scrape, skim coat, prime and paint. If they come back positive, the ceiling is either left intact and sealed, covered over, or removed by a licensed asbestos abatement contractor before anyone refinishes it. In a home built before 1978, painted texture also raises the lead question.

    We are Green Design and Build, a licensed residential general contractor based in Van Nuys (CSLB #1110975), working across Los Angeles, Orange, Ventura and the western edges of Riverside and San Bernardino counties. We remove popcorn ceilings and refinish them as smooth, painted ceilings. Asbestos testing and abatement are handled by a licensed asbestos abatement contractor, and the test itself should come from an independent certified consultant. This guide has no prices in it on purpose: the cost depends on what the lab finds and what the room looks like, and the only honest number comes from a site visit.

    Drywall and paint stage — kitchen remodel in Pasadena, CA
    Patched drywall waiting for skim coat and primer on a Pasadena kitchen remodel.

    What a popcorn ceiling actually is

    “Popcorn,” “cottage cheese” and “acoustic” ceiling all mean a bumpy texture sprayed onto drywall or plaster. One pass hid rough taping without the labor of a smooth finish, and it softened echo. We still find it in a great many older Los Angeles houses, from Valley ranch homes to hillside places and condos.

    It matters what category the material falls into. California’s construction asbestos standard, Title 8, Section 1529, defines “surfacing material” as material sprayed, troweled on or otherwise applied to surfaces, and gives acoustical plaster on ceilings as its example. The EPA lists textured paint and patching compounds used on walls and ceilings among the places asbestos may be found in a home (EPA, Learn About Asbestos). Some textures contain it. Others do not. The ceiling looks the same either way.

    Why the asbestos test comes before any scraping

    • Looking does not answer the question. The EPA’s homeowner guidance is plain: generally you can’t tell whether a material contains asbestos simply by looking at it, unless it is labeled (EPA, Protect Your Family from Exposures to Asbestos).
    • Intact texture is not the main problem. Disturbed texture is. EPA says the best course is usually to leave asbestos-containing material alone if it is in good condition, and warns against sawing, sanding, scraping or drilling it.
    • The law already presumes the worst for older ceilings. Under Section 1529, surfacing material in buildings constructed no later than 1980 is “presumed asbestos-containing material” for construction work. A building owner can rebut that presumption only with an inspection or tests performed by an accredited inspector or a certified industrial hygienist.

    We do not treat any construction year as proof that a ceiling is clean. The 1980 date above is Cal/OSHA’s line for a legal presumption on job sites, not a guarantee about anything built later. Every textured ceiling we take down gets tested first, whatever year the house was built.

    Does my popcorn ceiling have asbestos? How testing works

    The only way to know is a lab analysis of samples taken from the ceiling. In Southern California the person taking those samples for a renovation needs real credentials, and the EPA recommends against taking samples yourself.

    1. A certified consultant surveys the area. South Coast AQMD Rule 1403 requires the affected area to be thoroughly surveyed for asbestos before a renovation, by a surveyor certified by Cal/OSHA who has passed an EPA-approved Building Inspector course. In practice that means a Cal/OSHA Certified Asbestos Consultant (CAC) or a Cal/OSHA-certified Site Surveillance Technician (CSST).
    2. Samples are taken from more than one spot. Ceilings were often patched or re-sprayed, so rooms can differ. The survey should cover every ceiling you plan to disturb.
    3. A laboratory analyzes the samples. Rule 1403 requires the survey report to document the surveyor, the sample locations with a sketch, the laboratory, the test methods and the results.
    4. You get a written report. Keep it; every contractor who works on that ceiling relies on it.

    The EPA also advises that the person who assesses the material should not be connected with the firm that removes it, and that using two different firms avoids a conflict of interest. We follow that: the consultant who tests your ceiling is not the company that profits from the answer.

    RoleCredential to look forWhat they do on a popcorn ceiling job
    Asbestos consultantCal/OSHA Certified Asbestos Consultant (CAC) or Cal/OSHA-certified Site Surveillance Technician (CSST)Surveys the ceilings, takes samples, sends them to a lab and documents the results in a survey report
    Asbestos abatement contractorCSLB C-22 Asbestos Abatement license plus Cal/OSHA asbestos registrationContains the area and removes, encapsulates or encloses asbestos-containing texture; handles disposal and air-district notification
    General contractor (us)CSLB license; ask any painting contractor working in a pre-1978 home for its EPA lead-safe (RRP) firm certificationProtects the house, removes non-asbestos texture, repairs drywall, skim coats, primes and paints, and coordinates the sequence

    Our guide to verifying a contractor’s license in California shows where to look up a CSLB number and its classifications.

    The rules that apply in Southern California

    Several sets of rules overlap on a popcorn ceiling job. This is a plain-English summary, not legal advice.

    South Coast AQMD Rule 1403 (Los Angeles, Orange, Riverside, San Bernardino)

    The South Coast Air Quality Management District covers large parts of Los Angeles, Orange, Riverside and San Bernardino counties, and its Rule 1403 governs asbestos in demolition and renovation:

    • Survey first. A thorough asbestos survey is required before renovation. For single-unit homes, the rule waives the survey requirement only where less than 100 square feet of asbestos-containing material is removed or stripped.
    • Notification. Removing 100 square feet or more of asbestos-containing material generally requires notifying the district no later than 10 working days before work starts.
    • Wet methods. The rule’s removal procedures require asbestos-containing material to be adequately wet during removal and during collection and packaging.
    • The owner-occupant exemption is narrow. Rule 1403 does not apply to an owner-occupant of a single-unit home who personally does the renovation. The district’s guidance for owners limits it to an owner who lives there, is named on the deed of trust, and does the work personally, not through laborers, friends or family, in a house that is not a rental, business property or vacant. The district does not recommend homeowners remove asbestos.

    Townhouses, condominiums and apartment buildings are not “residential single unit dwellings” under the rule, so the owner-occupant exemption does not reach them.

    Ventura County: Rule 62.7

    Ventura County has its own air district. The Ventura County Air Pollution Control District regulates asbestos renovation and demolition through its Rule 62.7. A survey is required if asbestos-containing material will be disturbed during remodeling, removing 100 square feet or more requires written notice, and only owner-occupants doing their own work are exempt.

    Cal/OSHA and the Contractors State License Board

    • Worker protection. 8 CCR 1529 regulates asbestos exposure in all construction work and requires wet methods or wetting agents during removal.
    • Registration. Any contractor or employer doing asbestos-related work involving 100 square feet or more of asbestos-containing construction material at a single worksite must be registered with Cal/OSHA (Cal/OSHA asbestos registration FAQ).
    • License. Under Business and Professions Code §7058.5, a contractor may not do asbestos-related work involving 100 square feet or more of asbestos-containing material unless it holds the C-22 classification or its qualifier has passed the asbestos certification exam. CSLB’s C-22 Asbestos Abatement classification covers containment, encapsulation and removal, and CSLB will not issue it unless the applicant is registered with Cal/OSHA.

    Building permits

    A building permit is rarely the sticking point. In the City of Los Angeles, painting, papering and similar work is on the list of work exempt from a permit in LAMC 91.106.2. Refinishing a ceiling on its own is that kind of finish work. The exemption is about the building code only. It does not touch air-district or Cal/OSHA asbestos rules, and the answer changes if the ceiling work turns into moving lights, adding circuits or altering framing. Other cities have their own lists.

    If the test comes back positive

    A positive result is a planning problem, not an emergency. If the texture is intact and undisturbed, nothing has to happen today. You have four choices:

    1. Leave it alone. For a ceiling in good condition that nobody plans to touch, EPA’s default advice is to leave it. Don’t drill, hang fixtures or scrape a patch.
    2. Seal it (encapsulation). EPA describes sealing as treating the material with a sealant that binds the asbestos fibers together. The asbestos stays in place.
    3. Cover it (enclosure). Placing something over the material, such as a new drywall ceiling, is EPA’s other repair option. Again, the asbestos stays in place, and fastening through it disturbs it at every screw, so the method should come from your consultant.
    4. Have it abated. A licensed asbestos abatement contractor contains the area, removes the texture wet, packages and disposes of it, and files whatever notice the air district requires. Once the abatement work is complete and the area is cleared, we come in to repair, skim coat, prime and paint.

    Which one is right depends on the plan. If you are about to open the ceiling anyway for new recessed lighting, a knob-and-tube rewire or a whole-home renovation, abatement tends to make sense, because those trades would otherwise cut into the same material. If the ceiling is sound and you are only after a better look, sealing or covering may be enough.

    Lead paint: the second question in pre-1978 homes

    Many popcorn ceilings were painted at some point, and in a home built before 1978 that paint may contain lead. Scraping painted texture disturbs the paint too.

    The EPA’s Renovation, Repair and Painting (RRP) rule requires firms performing renovation, repair and painting projects that disturb lead-based paint in homes built before 1978 to be EPA- or state-certified, to use certified renovators, and to follow lead-safe work practices. For you, that means three things:

    • Ask whether the ceiling has ever been painted. Unpainted texture is soft and absorbs water quickly; painted texture sheds water and scrapes hard.
    • In a pre-1978 home, either test the paint or have the work done as if it contains lead.
    • Ask any firm doing the work for its RRP firm certification, the same way you would check its CSLB license. Lead and asbestos are separate tests; clearing one does not clear the other.

    How popcorn ceiling removal works once the ceiling tests clean

    With a negative asbestos result and the lead question settled, removal is a drywall and painting job:

    1. Empty and contain the room. Furniture out, floors covered, walls and doorways sealed in plastic, and HVAC registers closed so dust does not travel through the ducts.
    2. Make the ceiling safe to work on. Power to ceiling circuits is shut off at the panel, and fixtures and smoke alarms come down.
    3. Wet the texture in sections. A light, even mist softens unpainted texture in a few minutes. Too much water soaks the drywall paper and tears it.
    4. Scrape. A wide blade lifts the softened texture off in sheets. Debris is bagged as it falls.
    5. Repair what the texture was hiding. Popcorn was often sprayed over rough taping, so removal exposes seams, nail pops and stains that need re-taping, filling and sealing.
    6. Skim coat. Thin coats of joint compound across the whole ceiling create a uniform surface. Side light from windows shows every ridge, so most ceilings need more than one coat.
    7. Sand, prime and paint. Fine sanding, a drywall primer to seal the new compound, then ceiling paint.
    8. Clean up and reinstall. Plastic comes down, fixtures and smoke alarms go back up.

    Painted texture changes steps 3 and 4: the paint stops water getting in, so scraping is harder and leaves more gouges. Sometimes covering a well-bonded painted ceiling beats fighting it off, a call we make on site.

    Refreshing the walls at the same time shares the setup. Our interior and exterior painting services page covers how we handle the rest of the room, and our painting design ideas gallery shows finished rooms.

    Remove, cover, seal or leave it: comparing the options

    OptionWhat it involvesBest suited toTrade-offs
    Scrape, skim and paintRemove the texture, repair, skim coat, prime, paintCeilings that tested negative for asbestosMessiest option; finish depends on what is underneath
    Abatement, then refinishLicensed abatement contractor removes it; then repair, skim, prime, paintPositive ceilings in rooms being remodeled or rewiredTwo contractors, air-district notice for larger areas, more scheduling
    Cover with new drywallFasten new drywall to the framing over the old ceiling, then tape and finishPainted, damaged or hard-to-scrape ceilings; some positive ceilings on consultant adviceFixtures and boxes need extending; slight loss of ceiling height; the old material stays up there
    Seal (encapsulate)Coat the texture with a sealant or paint suited to itIntact ceilings, positive or not, where the look is acceptableStill a popcorn ceiling; makes later removal harder
    Leave it aloneNothing, beyond not disturbing itIntact ceilings with no work planned overheadNo change to the look; any future ceiling work starts with this same decision

    What drives the cost of popcorn ceiling removal

    We don’t publish a price for this work because the variables swing it too far for a range to be useful. These factors decide your number:

    • The test result. A negative result keeps the job in finish-trade territory. A positive result adds a separate abatement contract, possible air-district notice and a second crew on the schedule.
    • Painted or unpainted texture. Painted texture is slower to remove and leaves more damage to repair.
    • Area and height. Square footage matters, but so does reach. Vaulted living rooms and stairwells need scaffolding or tall planks, which slows everything.
    • What is underneath. Clean, well-taped drywall needs a light skim. Rough seams, cracks, sagging panels or old water damage need real repair first.
    • Finish level. A ceiling raked by side light shows flaws a flat-lit bedroom hides, and needs more skim work.
    • Occupied or empty. Containing a furnished, lived-in house room by room takes more labor than working through an empty one.
    • Fixtures and penetrations. Every light, fan, vent and smoke alarm comes down and goes back up.
    • Lead and bundling. Lead-safe practices in a pre-1978 home add setup and cleanup; doing ceilings alongside painting or a remodel shares it.

    For the painting side of the budget, our interior painting cost guide for Los Angeles explains how prep work affects a painting quote. If the ceilings are part of a bigger plan, the whole-home renovation cost guide and the kitchen remodel cost guide show where ceiling work sits in a full project budget, and our financing options page covers ways to spread the cost.

    How long it takes, and what slows it down

    The scraping is rarely the long part. The calendar is driven by:

    • Testing. Scheduling the consultant and waiting for lab results comes before anything else.
    • Air-district notice. If abatement of 100 square feet or more is needed in South Coast AQMD territory, notification generally has to be filed 10 working days before the work begins.
    • Drying time. Each skim coat has to dry before it is sanded and the next goes on.
    • Rooms and occupancy. An empty house goes faster than working room by room around a family, and damage found under the texture adds repair time.

    Should you scrape it yourself?

    Not before a test. After a negative test, it is your call, but go in with your eyes open.

    Most DIY videos skip the first step. Scraping an untested ceiling is exactly the disturbance EPA tells homeowners to avoid, and if the texture does contain asbestos, the dust ends up in your floors, ducts and clothes. Rule 1403’s owner-occupant exemption means the rule does not cover you working on your own house; it does not make the material safer, and South Coast AQMD does not recommend homeowners remove asbestos. With a clean result, DIY removal is legal. What people underestimate is the containment, hours of overhead work, and how hard it is to skim a ceiling flat enough to look right under real light.

    Popcorn ceilings as part of a bigger project

    When ceiling removal is part of a remodel, sequence it rather than tacking it on:

    Get the scope and order of work in writing, including who orders the asbestos survey. Our checklist on hiring a general contractor without getting scammed and our explainer on California contractor payment schedules cover the contract side.

    Popcorn ceiling removal FAQs

    Does my popcorn ceiling have asbestos?

    The only way to know is to have samples analyzed by a laboratory. You cannot tell by looking, and the year the house was built is not proof either way. Cal/OSHA presumes surfacing material in buildings built no later than 1980 contains asbestos until an accredited inspection or test shows otherwise, but later ceilings should still be tested before anyone disturbs them.

    Who can test a popcorn ceiling for asbestos in California?

    For a renovation in South Coast AQMD territory, Rule 1403 requires the survey to be done by someone certified by Cal/OSHA who has passed an EPA-approved Building Inspector course, typically a Certified Asbestos Consultant or a certified Site Surveillance Technician. EPA recommends that the person testing not be connected with the company that would remove the material.

    What happens if my popcorn ceiling tests positive for asbestos?

    You choose between leaving it alone, sealing it, covering it with new drywall, or having it removed by a licensed asbestos abatement contractor that holds a CSLB C-22 license and Cal/OSHA registration. Removing 100 square feet or more generally requires notice to the air district before work starts. After abatement, the ceiling is repaired, skim coated, primed and painted.

    Is it safe to live in a house with an asbestos popcorn ceiling?

    EPA’s guidance is that asbestos-containing material in good condition is usually best left alone, because the risk comes from disturbing it. Avoid scraping, sanding, drilling or hanging anything from the ceiling, and have it assessed if it is crumbling, water-damaged or about to be worked on.

    Can I remove a popcorn ceiling myself?

    Not before it has been tested. With a negative result, a homeowner can legally remove it. With a positive result, South Coast AQMD does not recommend homeowners remove asbestos, even though an owner-occupant working on their own single-family home is exempt from Rule 1403.

    Can I paint over or cover a popcorn ceiling instead of removing it?

    Yes. Sealing the texture and covering it with new drywall are both EPA-recognized ways to keep the material in place. Both leave the old texture up there, so keep your test report, and if it contains asbestos, follow your consultant’s advice on fastening through it.

    How much does popcorn ceiling removal cost?

    We quote it after a site visit rather than publishing a range, because the test result, painted texture, ceiling height, the drywall underneath and whether the house is furnished all move the price substantially. If asbestos is present, abatement is a separate contract with a licensed abatement contractor.

    Do I need a permit to remove a popcorn ceiling in Los Angeles?

    In the City of Los Angeles, painting, papering and similar work is exempt from a building permit under LAMC 91.106.2, and refinishing a ceiling on its own is that kind of finish work. That exemption does not cover asbestos rules: surveys, air-district notification and licensed abatement still apply where the material is present. Electrical or framing changes made at the same time can require a permit.

    Get your ceilings done in the right order

    Test, decide, then remove and refinish. We walk the rooms with you, look at the texture and the drywall under it, tell you what the test needs to cover, coordinate the licensed abatement contractor if one is needed, and give you a written scope. Site visits take about two hours, proposals follow within 48 hours, and we reply to every inquiry within one business day. You can contact our team to schedule a site visit.

  • Stucco Repair in Los Angeles: Patch, Re-Coat or Re-Stucco?

    Stucco Repair in Los Angeles: Patch, Re-Coat or Re-Stucco?

    Most stucco problems on a Southern California house need one of three fixes. A patch handles a few cracks or a damaged section where the wall behind is dry and the surrounding stucco is still hard and bonded. A re-coat — a new cementitious color coat, an elastomeric coating or paint — suits stucco that is sound but faded, chalky or covered in fine hairline cracks. A full re-stucco is for walls where the stucco is loose, soft or water-damaged, or the building paper and lath behind it have failed, so the only lasting fix is to strip back to the framing and rebuild. The deciding question is rarely how the surface looks. It is whether the wall behind it is dry, and whether the stucco is still attached.

    We are Green Design and Build, a licensed residential general contractor based in Van Nuys (CSLB #1110975), working across Los Angeles, Orange, Ventura and the western parts of Riverside and San Bernardino counties. We do stucco repair and full re-stucco, often alongside exterior painting, window replacement and structural work. This guide deliberately contains no prices: stucco cost depends on what is behind the surface, and the only honest number comes from a site visit.

    Patch, re-coat or re-stucco: a quick diagnosis

    Walk the house in daylight, tap suspect areas with a screwdriver handle, and look closely at the bottom of each wall where it meets soil or paving. Then match what you find:

    What you seeUsual fixCheck first
    Fine hairline or web-like “map” cracks; the stucco sounds solid when tappedRe-coatThat no crack is wider or offset
    One or two diagonal cracks from window or door cornersPatch, then finish the whole wall panelWhether they reopen after patching
    A crack that catches a fingernail, or one side sitting proud of the otherFind the cause before patchingFoundation, framing, earthquake damage
    Hollow sound when tapped; bulges; pieces falling awayReplace the section, including lath and paperHow far the loose area extends
    Staining, white mineral deposits (efflorescence) or crumbly stucco under windows or at the baseTrace the water first; often a section or full re-stuccoWindow flashing, roof runoff, sprinklers, a buried weep screed
    Faded or chalky color, no cracksPaint or a new color coatThat the surface is clean and sound
    Repeated patches, several walls failing, or rot found during a repairFull re-stuccoFraming, termite damage, window flashing

    Two walls that look identical can have completely different problems behind them, so a contractor who quotes without tapping a wall or asking about leaks is guessing.

    How a stucco wall is built, and why it decides the repair

    Stucco is not a coating; it is a layered cement plaster system. Section R703.7 of the 2025 California Residential Code requires exterior plaster to be installed in compliance with ASTM C926, the standard for applying portland cement-based plaster, and ASTM C1063, the standard for installing the lath it is applied to. From the framing out:

    1. Framing and sheathing. Many older houses have no sheathing — the paper and wire are stretched straight across the studs. Newer houses usually have plywood or OSB.
    2. Water-resistive barrier. The building paper. Section R703.7.3 sets its performance: in dry climate zones, two separately installed layers of 10-minute Grade D paper (or an equivalent), or a single 60-minute Grade D layer separated from the stucco by a drainage or other non-absorbing layer; in marine climate zones, an added drainage space of at least 3/16 inch. The paper is what keeps water out of the house; the stucco only sheds most of it.
    3. Lath. Corrosion-resistant expanded metal, welded wire or woven wire. Section R703.7.1 requires the nails or staples to be no more than 7 inches apart along each stud.
    4. Scratch and brown coats. Section R703.7.2 requires at least three coats of plaster over metal or wire lath. Over wire lath, Table R702.1(1) sets a minimum thickness of 7/8 inch for exterior cement plaster.
    5. Finish coat. The thin top coat that gives the wall its texture and, with a cementitious color coat, its color.
    6. Weep screed. A metal or plastic strip at or below the foundation plate line. Under Section R703.7.2.1 it must sit at least 4 inches above the earth or 2 inches above paved areas and let trapped water drain to the outside.

    Two consequences matter for repair. The code sets curing intervals for three-coat work (Section R703.7.5) — at least 48 hours between the first and second coats and at least seven days before the finish coat — so a real re-stucco cannot be rushed. And everything that keeps water out is behind the plaster: a surface patch can make a wall look right while the paper behind it is still torn.

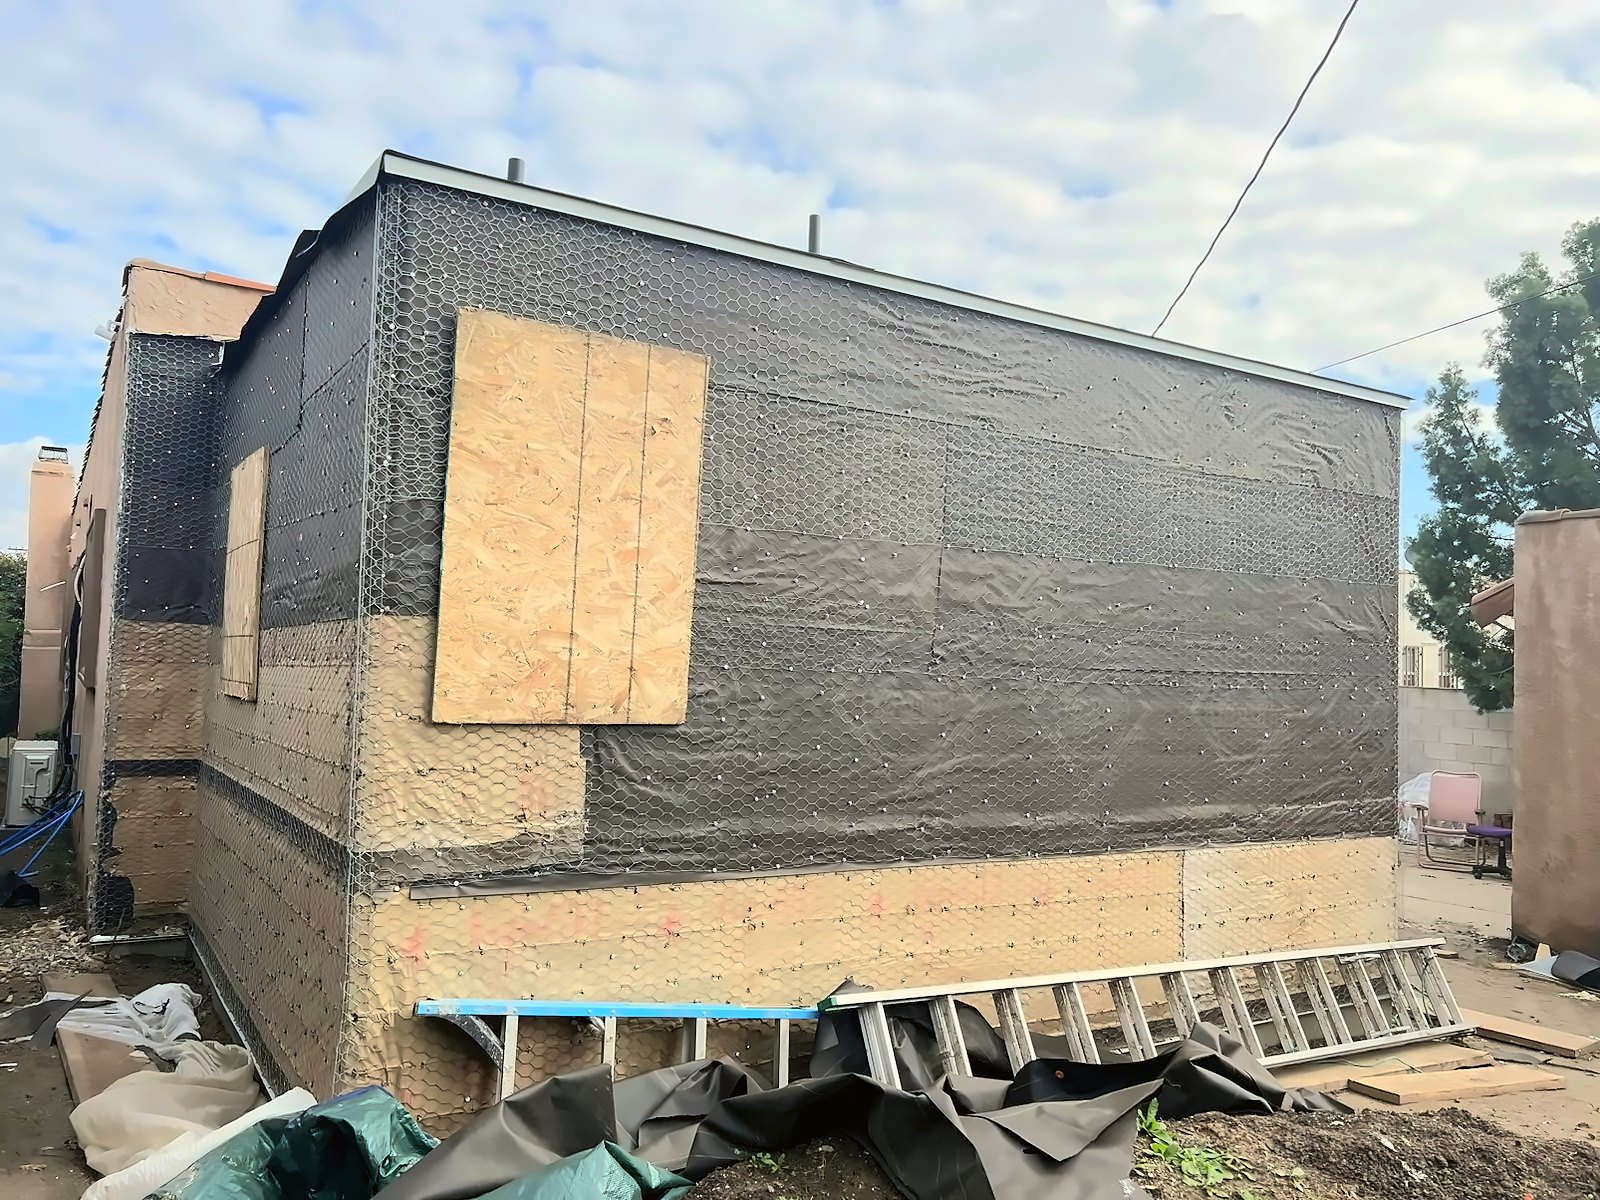
    Wood-frame wall covered in black building paper and wire stucco lath before the first plaster coat
    Building paper and wire lath on one of our attached ADU projects in Los Angeles — the layers a full re-stucco replaces and a surface patch never reaches.

    Reading stucco cracks: what is normal and what is not

    Cement plaster shrinks as it cures and moves with temperature and with the framing behind it, so some cracking is normal on almost every stucco house. What matters is the pattern, the width and whether the crack is still moving. Where structure is in question, none of this replaces an engineer.

    Hairline and map cracking

    Fine cracks in a random, web-like pattern are usually shrinkage in the plaster itself. On a wall with sound paper behind it they are mainly cosmetic — the classic case for re-coating rather than patching crack by crack.

    Diagonal cracks at window and door corners

    Openings concentrate stress, so short diagonal cracks from the corners of windows and doors are common. A single, narrow, stable corner crack is a patch. One that keeps reopening, or comes with a door or window that has started to stick, points to movement a patch will not fix.

    Wide, stepped or offset cracks

    Cracks that catch a fingernail, cracks where one side sits proud of the other, long horizontal cracks, and cracks that line up with cracks in the slab or interior drywall should be investigated before anyone patches them. Our guide to the warning signs your foundation needs repair covers what to look for indoors, and our foundation repair cost guide explains the fixes. Patching over active movement just produces a neat new crack in the same place.

    Cracks after an earthquake

    New cracking after a quake is a reason to have the cripple walls and foundation connection looked at, not only the stucco. If the house has never been retrofitted, read about seismic retrofitting and the state’s Earthquake Brace + Bolt grant program before spending money on the surface.

    Option 1: patching stucco properly

    A good stucco patch is a small re-stucco, not a smear of filler. On anything bigger than a hairline crack:

    1. Cut back to sound stucco until the edges are hard and well bonded.
    2. Inspect what is exposed. If the paper is torn or the lath rusted or loose, the opening grows until it reaches sound paper and lath on every side, and new paper is lapped shingle-fashion with the old so water still drains outward and down.
    3. Rebuild in coats, with time to cure, not in one thick pass that shrinks and cracks.
    4. Match the texture — sand finish, lace, dash or smooth trowel — by hand, ideally on a test area first.
    5. Finish the whole panel, carrying the color to a natural break such as a corner or joint rather than dabbing it over the patch.

    Step five is why so many patches show: fresh color over a patch rarely matches a wall that has had years of sun. Ready-mixed acrylic stucco patch is fine for hairline cracks and nail holes, but caulk smeared over cracks is not a repair — it collects dirt, will not hold texture and shows through paint.

    Option 2: re-coating sound stucco

    When the stucco is hard, bonded and dry but tired — faded, chalky, covered in fine cracks — re-coating gives the wall a new surface without tearing it off. The three common approaches behave differently:

    Compared onCementitious color coatExterior acrylic paintElastomeric coating
    What it isA new thin coat of cement-based finish plaster, color mixed inA standard exterior paint systemA thick, flexible coating applied much heavier than paint
    Hairline cracksFilled as part of the new finish coatBridges very little; cracks tend to show throughDesigned to span small cracks
    MoistureCement-based, with no paint film on the surfaceVaries by product; check the vapor permeability ratingTypically low vapor permeability; can hold moisture in the wall
    Best forRefreshing or re-texturing unpainted stuccoSound walls with few cracksDry walls with widespread hairline cracking

    Elastomeric is often sold as the answer to cracked stucco, and on the right wall it is a good one. The Northwest Wall and Ceiling Bureau’s technical guidance on painting stucco notes that elastomeric coatings are typically very low in vapor permeability and can trap moisture trying to leave the wall, should not be used to solve a water-intrusion or flashing problem, and can be difficult to remove or re-color later. It recommends coatings for stucco with a perm rating of 7 or higher.

    In practice: use elastomeric on a dry wall with lots of fine cracks, and never to cover a stain nobody has explained. For the painting side, see our exterior house painting cost guide and browse our exterior painting design ideas.

    Option 3: a full re-stucco

    A full re-stucco removes the old plaster, lath and paper down to the framing or sheathing and rebuilds the wall to the current code. It is the right call when:

    • Large areas sound hollow or are coming away from the wall.
    • Water has got behind the stucco and the paper has failed — staining, soft plaster, rot at the sill plate.
    • The house has been patched so often that the walls no longer read as one surface.
    • The walls are being opened anyway for new windows, an addition or a whole-home renovation.
    • There is no working weep screed, and soil or paving has built up against the wall.

    Some bids call a new layer of plaster over old stucco a “re-stucco”. Over sound, well-bonded stucco that is really a re-coat, and it can be the right job; over loose or wet stucco it only hides the problem. Ask every bidder which one they mean.

    What happens during a re-stucco

    1. Protection and access — landscaping, windows and hardscape covered; scaffolding where the wall height needs it.
    2. Tear-off of stucco, lath and paper. On a pre-1978 house with painted stucco, this falls under the EPA’s Renovation, Repair and Painting rule: paid work that disturbs paint in pre-1978 housing must be done by certified firms, and while exterior jobs of 20 square feet or less are generally exempt, demolition of painted surfaces is covered regardless of size.
    3. Framing inspection and repair. The step that changes the scope: rot at sill plates, termite damage and wet sheathing are fixed before anything new goes on.
    4. Weep screed at the foundation line, with the code’s clearances.
    5. New paper, with windows and doors flashed and lapped into it.
    6. New lath, fastened to the framing.
    7. Scratch, brown and finish coats, with the required curing time between them.
    8. Inspections and cleanup.

    If your windows are original or near the end of their life, a re-stucco is the best chance you will get to replace them: the wall is already open, and new window flanges can be flashed into new paper. Our window replacement cost guide explains the options, and our windows and doors page covers what we install.

    Stucco repair cost: what actually drives the number

    We do not publish a price range for stucco work, because a range wide enough to be honest would be too wide to be useful. Two houses with the same area of cracked stucco can end up in very different places depending on what is found behind the surface. These are the factors that move the number:

    Cost driverWhy it changes the price
    Area and number of wallsMore material and labor, and finishing whole panels for a color match adds area beyond the damage
    Wall height and accessTwo-story walls, hillside lots and tight side yards need scaffolding
    What is behind the stuccoRot, termite damage or failed sheathing must be repaired first, and cannot be priced until it is seen
    Paper and lathA surface repair keeps them; a section repair or re-stucco replaces them
    Color and texture matchingHand-matching an old texture is skilled work; an aged color rarely matches without re-coating the panel
    Windows and flashingRe-flashing or replacing windows adds scope now but avoids cutting into new stucco later
    Permit, inspections and lead-safe workA permit is required for re-stucco in the City of Los Angeles; painted pre-1978 houses need lead-safe containment

    The useful number is a written scope: which walls, which layers, what happens if rot is found, and how the finish will be matched. We price that after a site visit of about two hours and send a written proposal within 48 hours. If stucco is part of a larger project, our financing page explains how payment can be spread out.

    Do you need a permit for stucco repair in Los Angeles?

    In the City of Los Angeles it depends on the scope:

    • Painting and re-coating. LAMC Section 91.106.2 lists painting, papering and similar work as exempt from permit.
    • Small repairs. The same section exempts work valued at $2,500 or less, unless it affects structural stability or public safety, is done to comply with a Department order, or changes the use or occupancy. Our roof permit guide explains this exemption in more detail.
    • Re-stucco. LADBS lists “re-stucco for residential buildings” in its Express Permits bulletin, P/GI 2020-003 — work that needs a permit but no plan check. The bulletin also lists replacing existing siding with new stucco on single-family dwellings and duplexes.

    The inspections are what protect you: someone independent sees the paper, lath and screed before they disappear under plaster. Our guide to LADBS permit costs explains how fees are worked out. Outside the City of Los Angeles — Glendale, Burbank, Pasadena, unincorporated county areas, and the cities of Orange and Ventura counties — each building department sets its own rules.

    Houses in fire hazard areas

    For the 2025 code cycle, California moved its wildfire construction rules out of Section R337 of the Residential Code and into Title 24, Part 7, the California Wildland-Urban Interface Code. Its Section 504.5 limits exterior walls of the buildings it covers to listed methods, including noncombustible materials, one-hour fire-resistance-rated construction on the exterior side and tested assemblies. If your house is in a mapped fire hazard area, ask the building department how a re-stucco will be documented under Part 7 before work starts. We cover rebuilding after a wildfire on our fire rebuild page.

    Mistakes that make stucco problems worse

    • Burying the weep screed. Raised planters, new topsoil, pavers or a patio poured tight to the house hold water against the bottom of the wall. The code’s 4-inch clearance above soil and 2-inch clearance above paving exist so trapped water can get out.
    • Sealing the screed shut with paint, caulk or mortar packed into the drainage gap.
    • Patching without finding the water. A stain under a window is usually a flashing or runoff problem, and stains near the roofline often start at the roof edge — see our guide to roof leak repair, and check whether the roof is simply at the end of its life using how long a roof lasts in Southern California.
    • Using elastomeric or caulk to stop a leak. Both hide the symptom and can trap the moisture behind it.
    • Sprinklers aimed at the house. A wall soaked every morning stays wet at the base, and adjusting the heads costs nothing.
    • Patching a moving crack again and again. If a crack returns, the problem is not the stucco.

    Can you repair stucco yourself?

    Yes, for small things: hairline cracks, nail and screw holes, and a small ding where the paper behind is intact. Call a professional when the stucco sounds hollow, when there is staining or softness, when cracks are wide or keep returning, when the damage is more than a small patch, or when the house was built before 1978 and the stucco is painted.

    How to choose a stucco contractor

    The Contractors State License Board licenses lath and plaster specialists under the C-35 Lathing and Plastering classification. Whoever you hire, check the license first — our guide on how to verify a contractor’s license in California takes a couple of minutes — and then ask:

    1. Will you open the wall around the damage, and how is the price handled if you find rot or torn paper?
    2. Does this need a permit, and who pulls it?
    3. How will you match the texture and color, and how far will the finish coat extend?
    4. Where will the weep screed end up relative to the soil and paving?
    5. If the house is pre-1978 and painted, is your firm RRP-certified?
    6. What does the warranty cover? Ours is set out on our warranty page.

    Our questions to ask before hiring an exterior painter apply equally to the coating side of the job, and you can read what homeowners say about working with us on our reviews page — 4.7 stars across 146 Yelp reviews.

    Stucco repair FAQs

    How much does stucco repair cost?

    There is no honest single number. Cost depends on the area, wall height and access, whether the paper and lath must be replaced, what is found behind the stucco, how color and texture are matched, and whether a permit is needed. A small patch and a whole-house re-stucco are different jobs, which is why we price stucco only after a site visit.

    Can a stucco patch be made invisible?

    Close to it, if the texture is matched by hand and the color is finished across the whole wall panel to a corner or joint. A patch colored on its own almost always shows, because the wall around it has faded.

    Is elastomeric paint good for cracked stucco?

    It works well on dry walls with widespread hairline cracking, because it is designed to span small cracks. Northwest Wall and Ceiling Bureau guidance notes that elastomeric coatings are typically low in vapor permeability, can trap moisture, should not be used to fix water intrusion, and can be hard to remove or re-color later.

    How long does new stucco need to cure before painting?

    The California Residential Code requires at least 48 hours between the first and second coats of three-coat stucco and at least seven days before the finish coat. For paint, Northwest Wall and Ceiling Bureau guidance is to wait until the surface pH drops to 8 or lower, which typically takes a week to 10 days; follow the coating manufacturer’s instructions too.

    Do I need a permit to re-stucco my house in Los Angeles?

    Yes, in the City of Los Angeles. LADBS lists re-stucco for residential buildings as an express permit, so no plan check is required. Painting is exempt, and repairs valued at $2,500 or less are exempt unless they affect structural stability or public safety. Other cities set their own rules.

    How can I tell if a stucco crack is structural?

    Fine, random hairline cracks are usually shrinkage. Cracks that catch a fingernail, cracks with one side offset, long horizontal or stair-stepped cracks, and cracks that keep reopening or line up with cracks indoors suggest movement and should be investigated before anyone patches them.

    How long does a re-stucco take?

    Longer than most people expect. The code’s curing intervals alone add more than a week between the first coat and the finish coat, before tear-off, framing repairs, paper and lath, inspections and weather. The schedule for a specific house comes with the written proposal.

    Should I replace my windows when I re-stucco?

    If the windows are near the end of their life, yes. The wall around them is already open, so new windows can be flashed properly into the new paper; replacing them later usually means cutting into fresh stucco.

    Have your stucco looked at before you choose a fix

    The right repair depends on what is behind the surface, and that is something we check in person. We tap the walls, open suspect areas where needed, look at the base of each wall and the water sources above it, and give you a written scope that says whether you need a patch, a re-coat or a re-stucco, and why. Site visits take about two hours, proposals follow within 48 hours, and we reply to every inquiry within one business day. Call (800) 348-3050, 8am–6pm daily, or request a stucco repair estimate.

  • What Questions Should You Ask Before Hiring an Exterior Painter?

    What Questions Should You Ask Before Hiring an Exterior Painter?

    Ask an exterior painter five things before you sign: what preparation the price includes, the exact paint product and number of coats, how to verify the license and insurance, what the proposal, warranty and payment schedule say, and what happens if the paint fails early. In our experience, preparation can determine 60% to 70% of how well it holds up.

    Hiring an exterior painter is one of those decisions that can look simple until something goes wrong.

    A fresh coat of paint can make almost any house look great on day one. The real test comes 12, 18, or 24 months later, when the south-facing wall starts peeling, caulking begins separating around the windows, or faded, chalky paint starts rubbing off on your hand.

    After seeing enough exterior painting projects as Green Design and Build, a licensed general contractor (CSLB #1110975) based in Van Nuys, we’ve noticed that early paint failure is rarely random. Most problems can be traced back to shortcuts in preparation, poor materials, vague contracts, or underlying damage that should have been addressed before the first coat of paint ever went on.

    That is why we tell homeowners not to simply ask, “How much will it cost?”

    The better question is: What exactly am I getting for that price?

    Here are the questions we believe every homeowner should ask before hiring an exterior painter.

    On this page

    1. What Preparation Work Is Included in Your Price?

    A complete price should include washing the whole exterior with the pressure adjusted to each surface, scraping and feather-sanding failing paint, caulking gaps at windows, trim and siding joints, and priming bare or problem surfaces.

    Preparation is probably the most important part of an exterior paint job.

    We’ve seen homeowners compare three quotes and choose one that was thousands of dollars cheaper because, understandably, they assumed paint was paint.

    Then six months or a year later, they’re looking for someone to repair peeling or alligatoring paint.

    When one exterior painting estimate is dramatically cheaper than the others, the savings usually have to come from somewhere. In many cases, it comes from:

    • Less pressure washing
    • Minimal scraping
    • No sanding
    • Limited caulking
    • Skipped primer
    • Fewer coats
    • Lower-quality paint

    In our experience, preparation can determine 60% to 70% of how well an exterior paint job ultimately holds up.

    Will You Pressure Wash the Entire Exterior?

    Ask:

    “Will you pressure wash the entire exterior, and do you adjust the pressure depending on the surface?”

    Pressure washing removes dirt, chalking residue, loose material, cobwebs, mildew, and contaminants that can interfere with adhesion.

    But more pressure isn’t always better.

    Old wood siding, delicate stucco, and solid masonry should not necessarily be treated the same way. Excessive pressure can gouge wood, damage stucco, or push water behind surfaces.

    A knowledgeable painter should understand that the washing method needs to change depending on the substrate.

    A red flag is hearing something like:

    “We don’t really pressure wash. We just wipe it down.”

    Another warning sign is a contractor who plans to use the same pressure and method on every surface without considering what the house is made of.

    How Do You Handle Peeling or Cracking Paint?

    Ask:

    “How do you handle areas where the existing paint is peeling, cracking, or alligatoring? Do you feather-sand the edges?”

    Loose paint needs to be removed.

    Simply rolling new paint over failing paint does not magically bond everything together. Eventually, the old failing layer underneath continues to separate, taking the new coating with it.

    We also want to hear that the painter plans to feather-sand the transition between scraped areas and sound existing paint. Otherwise, visible ridges can remain even after the new coating is applied.

    If someone tells you, “The new paint will seal it down,” we would consider that a major warning sign.

    For pre-1978 homes and lead-safe practices, see our guide to verifying a contractor’s license and certifications.

    What Will You Caulk?

    Ask:

    “Will you caulk gaps around windows, trim, and siding joints? What type of caulk will you use?”

    Exterior caulking is not just cosmetic.

    Proper caulking helps prevent water from entering gaps around trim and joints, where it can eventually contribute to wood rot and paint failure.

    We prefer exterior-grade, paintable caulking designed to handle movement and weather exposure.

    Be cautious of vague answers such as, “We’ll caulk whatever needs it,” without any explanation of what areas are included or what material will be used.

    Where Will You Use Primer?

    Ask:

    “Where are you using primer? Are you spot-priming or applying a full prime coat?”

    Not every house necessarily needs a full primer coat, but certain areas absolutely may require actual primer.

    Those can include:

    • Bare wood
    • Newly repaired stucco
    • Exposed metal
    • Rust stains
    • Water stains
    • Knots or areas vulnerable to tannin bleed
    • Heavily repaired surfaces

    We’ve heard the phrase, “The paint already has primer in it,” used to justify skipping primer entirely.

    Paint-and-primer products can be useful, but they are not a substitute for the correct specialty primer on every bare or problem surface.

    2. What Exact Paint Are You Using, and How Many Coats Are Included?

    The proposal should name the brand, product line and sheen and state the number of coats; we generally want two full coats on most exterior projects.

    “Sherwin-Williams paint” is not specific enough.

    Neither is “Benjamin Moore.”

    Major manufacturers produce multiple product lines at very different price and performance levels.

    Ask:

    “What exact brand, product line, and sheen are you using?”

    For example, Sherwin-Williams offers products such as SuperPaint, Duration, and Emerald. They do not all cost or perform exactly the same.

    We want the contractor to be able to explain not only what product they are using, but why they believe that product makes sense for the particular house.

    Southern California sun can be especially hard on exterior coatings, particularly on south- and west-facing elevations that receive significant UV exposure.

    Lower-quality paints tend to lose color, chalk, and break down more quickly.

    We’ve seen homeowners save money purchasing cheaper paint themselves, only to discover that what looked like a smart savings upfront resulted in much faster deterioration.

    A quality exterior acrylic can cost more per gallon, but in the right conditions and with proper preparation, the difference in lifespan can be significant.

    Is the Price for One Coat or Two?

    Ask:

    “Does this estimate include one coat or two full coats?”

    We generally want two full coats on most exterior projects, particularly when:

    • The color is changing
    • The home has not been painted in many years
    • The existing color is uneven
    • The surface needs additional film build for protection

    One thin coat may look acceptable immediately after application, but it often provides less uniform coverage and less protection from UV exposure.

    We have seen homes begin showing uneven fading and blotchy sheen because one wall clearly received an insufficient amount of material.

    Do not accept a proposal that simply says “paint exterior” without stating the number of coats.

    “We’ll see how it looks” can easily turn into a mid-project upcharge when the second coat should have been priced from the beginning.

    Does Your Process Change Between Stucco, Wood, and Metal?

    Ask:

    “How does your preparation and product selection change between my stucco, wood trim, siding, fascia, and metal surfaces?”

    Different substrates have different needs.

    Stucco may require crack repairs, investigation of efflorescence, primer on patched areas, or a masonry-specific coating.

    Wood may require scraping, sanding, bare-wood primer, caulking, and inspection for rot.

    Metal may require rust treatment and the correct bonding or corrosion-resistant primer.

    If a contractor tells you that every surface receives essentially the same treatment, we would question how much attention is being given to substrate-specific paint failure.

    We handle stucco repair before painting as part of our remodeling services, so cracks are fixed rather than painted over.

    3. How Can I Verify That Your Company Is Properly Licensed, Insured, and Established?

    Look up the CSLB license number yourself, have the insurance broker send a current certificate of insurance, ask whether the crew are employees or subcontractors, and read recent reviews and call recent references.

    There is an important distinction between liking an estimator and trusting the company responsible for your home.

    A good salesperson may be personable, responsive, and easy to talk to.

    Those things matter, but they are not the same as verifying the company behind the sale.

    Can I Verify Your Contractor License?

    In California, ask for the contractor’s CSLB license number and look it up yourself.

    Do not simply take someone’s word that they are licensed.

    We recommend checking whether:

    • The license is active
    • The classification matches the work being performed
    • The company name matches
    • The license has been active for a reasonable period
    • There are disciplinary records worth investigating

    We also pay attention when a company markets itself as having “15 years of experience,” but the business or contractor license appears to be only several months old.

    There can be legitimate explanations, such as a restructure or new business entity, but it is reasonable to ask.

    Can Your Insurance Broker Send Me Proof of Coverage?

    Ask:

    “Can your insurance agent send me a current certificate of insurance?”

    Exterior painting often involves ladders, roofs, two-story homes, and occasionally lifts.

    You want to verify appropriate insurance coverage, including general liability and workers’ compensation when applicable.

    We prefer documentation coming directly from the insurance broker rather than an old screenshot or document forwarded without context.

    A reputable company should not become defensive because a homeowner wants to verify coverage.

    In fact, one of our strongest trust signals is when a contractor makes verification easy.

    Are Your Painters Employees or Subcontractors?

    Ask:

    “Will the people working on my home be your employees or subcontractors?”

    Neither answer automatically means good or bad work.

    There are excellent subcontracted crews.

    What matters is understanding who is responsible for the work, who supervises the project, whether the necessary insurance is in place, and who you should contact if there is a problem.

    We also like to know whether the same foreman or project lead will remain on-site throughout the job or whether the homeowner should expect different crews on different days.

    What Do Your Reviews Actually Say?

    Don’t stop at the star rating.

    We recommend reading a meaningful sample of recent reviews and looking for patterns.

    Pay attention to comments about:

    • Whether the crew arrived when promised
    • Whether the final bill matched the estimate
    • How change orders were handled
    • Communication during the project
    • Cleanup
    • How the company responded when something went wrong

    Interestingly, we often find three-star reviews especially useful because they can provide a more balanced picture than either glowing five-star praise or extremely angry one-star complaints.

    A company having a few negative reviews is not necessarily concerning.

    What matters more is the pattern and how the company responds.

    Can You Provide Recent References?

    Ask for references from exterior painting projects similar to yours and completed fairly recently.

    For example:

    “Can you give me two references from exterior stucco homes you’ve painted within the last year?”

    Then actually call them.

    Ask:

    • Did the crew show up consistently?
    • Were there unexpected charges?
    • How was communication?
    • Did anything go wrong?
    • How did the contractor handle it?
    • Would you hire them again?

    We would also want to see recent project photos, preferably before-and-after pictures of houses with similar materials.

    A gallery full of generic or stock-looking images does not tell you nearly as much as documented recent work.

    Want a real number for your project?

    The site visit and the itemized written estimate are free.

    4. What Exactly Is Written Into the Proposal, Warranty, and Payment Schedule?

    The proposal should list every surface included and what is excluded, how unexpected repairs are priced and approved, the color, product and sheen, what the warranty covers, a payment schedule tied to progress, and who handles cleanup and protection.

    This is where conversations become commitments.

    We’ve read plenty of proposals that look polished but become extremely vague in the areas most likely to cause a disagreement.

    If something matters to you, it should be written down before you sign.

    Which Surfaces Are Actually Included?

    The proposal should identify which surfaces are being painted.

    That could include:

    • Main exterior walls
    • Trim
    • Fascia
    • Soffits
    • Garage doors
    • Entry doors
    • Gutters and downspouts
    • Shutters
    • Railings
    • Gates

    We’ve seen situations where a homeowner believed “paint the exterior” obviously included the garage door, only to find out during the project that it would cost hundreds of dollars more.

    Our rule is simple:

    If a surface isn’t listed, assume it isn’t included until you confirm otherwise.

    What Is Excluded?

    A good proposal should also tell you what is not included.

    That might include:

    • Fence painting
    • Roof work
    • Extensive wood replacement
    • Major stucco repairs
    • Moving landscaping
    • Structural repairs

    A proposal with no exclusions at all doesn’t necessarily mean everything is included.

    Sometimes it simply means the exclusions have not been discussed yet.

    How Are Unexpected Repairs Handled?

    This may be one of the most important questions in the entire hiring process.

    Exterior prep often reveals hidden issues such as:

    • Dry rot
    • Damaged fascia
    • Cracked stucco
    • Failed caulking
    • Water damage

    Ask:

    “If you discover additional damage during prep, how will you price it, communicate it, and get my approval?”

    We have seen homeowners come home and discover that thousands of dollars in “necessary repairs” were already performed and added to the bill without prior approval.

    Even when the repair itself was legitimate, handling it that way destroys trust.

    We believe additional work should be explained and approved before it is performed whenever possible.

    Are the Color, Product, and Sheen Written Down?

    The contract should identify:

    • Manufacturer
    • Product line
    • Color name
    • Color code
    • Sheen
    • Number of coats

    We also recommend testing larger color samples directly on the exterior when possible.

    A color that looks perfect on a small sample card can look completely different when applied across an entire sun-facing wall.

    Spending a little extra time confirming the color is far easier than repainting the house.

    What Does the Warranty Actually Cover?

    Don’t just ask, “Do you offer a warranty?”

    Ask:

    “If the paint starts peeling on my south-facing wall 18 months from now, what happens?”

    That hypothetical forces the contractor to explain how their warranty actually works.

    Look for:

    • Length of labor warranty
    • What workmanship failures are covered
    • Whether peeling or blistering is covered
    • What exclusions apply
    • How warranty claims are submitted
    • Whether manufacturer coverage is separate from labor coverage

    A warranty stating only that workmanship is “guaranteed” without defining a time period or coverage is not very helpful.

    What Does the Payment Schedule Look Like?

    In California, home improvement contract deposit rules generally limit the down payment to the lesser of $1,000 or 10% of the contract price.

    Beyond the deposit, we prefer progress payments connected to actual project milestones rather than a contractor collecting most of the money before most of the work is completed.

    The proposal should clearly explain:

    • Deposit
    • Progress payments
    • What milestone triggers each payment
    • Final payment requirements

    We would not recommend handing over the final payment before completing a walkthrough and confirming that the agreed scope has been completed.

    Who Handles Cleanup and Protection?

    Exterior painting creates more mess than many homeowners expect.

    Scraped paint chips, sanding dust, tape, plastic, overspray, and debris all have to go somewhere.

    The proposal should address protection of:

    • Windows
    • Concrete and pavers
    • Landscaping
    • Outdoor furniture
    • Vehicles
    • Fixtures
    • Doors and hardware

    We also like to see expectations for daily cleanup and final cleanup written into the scope.

    5. What Happens If the Paint Starts Failing a Year or Two Later?

    Early failure, such as chalking, reopening cracks, separating caulk or a blotchy sheen, usually traces back to skipped cleaning, caulking or coats, lower-quality paint, or damaged wood that was painted over instead of repaired.

    Fresh paint hides a lot.

    This is one reason we caution homeowners against judging a painting contractor solely by how beautiful the house looks the afternoon the crew finishes.

    Many preparation shortcuts don’t reveal themselves immediately.

    They show up after months of sun exposure, temperature changes, and moisture.

    AreaShortcut and early sign (about 14 months)Proper preparation and result (five years)
    Surface cleaningOld chalky paint left under the new coat: powdery chalking on south and west wallsHouse thoroughly washed: no major chalking
    CaulkingSkipped or rushed: caulk pulling apart around window trimJoints caulked with a quality exterior product: no failed caulking
    CoatsOne thin coat instead of two: a blotchy, uneven sheenTwo full coats of a quality exterior coating: slight, even fading
    Damaged woodPainted over: cracking and bubbling come backReplaced instead of hidden: no bubbling around fascia boards

    What Early Failure Looks Like

    Imagine a stucco home painted about 14 months ago.

    On the south and west-facing walls, you begin seeing powdery chalking when you rub the surface.

    Hairline stucco cracks start reopening.

    Caulking around window trim is pulling apart.

    One wall has a blotchy, uneven sheen, suggesting that it received a thin coat or insufficient coverage.

    We’ve seen this combination before, and the causes are usually predictable.

    The surface may not have been thoroughly cleaned before painting.

    Old chalky paint may have remained underneath the new coating.

    Caulking may have been skipped or rushed, allowing moisture into joints.

    The house may have received one coat instead of two.

    The paint itself may have been a lower-quality product that couldn’t tolerate years of intense sun exposure.

    Or damaged wood may simply have been painted over instead of repaired.

    Painting over rot does not stop rot.

    Eventually, the movement and moisture underneath begin cracking and bubbling the coating again.

    South- and west-facing walls take the worst of the heat, which is why we specify prep and coatings differently for painting in the San Fernando Valley than near the coast.

    What a Properly Prepared Exterior Looks Like Years Later

    Now picture a similar house five years after painting.

    The color may have faded slightly, which is normal.

    But the fading is even.

    There is no significant peeling.

    No major chalking.

    No failed caulking pulling away from windows.

    No obvious roller lap marks.

    No bubbling around fascia boards.

    What probably happened differently?

    The crew thoroughly washed the house.

    They scraped failing paint.

    They feather-sanded transitions.

    They caulked joints with a quality exterior product.

    They primed bare and repaired surfaces.

    They replaced damaged wood instead of hiding it.

    Then they applied two full coats of a quality exterior coating.

    That is what good preparation buys you.

    Not a house that somehow never ages, but a paint system that ages gradually and predictably instead of failing prematurely in problem areas.

    The Most Important Question Isn’t “How Much?”

    We understand why homeowners compare exterior painting estimates primarily by price.

    Painting is expensive, and two bids can appear to describe the same project.

    But two estimates saying “paint exterior of house” can represent completely different amounts of work.

    One contractor may be pricing:

    • Thorough washing
    • Scraping
    • Sanding
    • Caulking
    • Spot priming
    • Minor repairs
    • Two coats of premium exterior paint
    • Detailed masking
    • Cleanup
    • A meaningful labor warranty

    Another may be pricing a quick wash and one coat.

    Those are not the same paint job.

    Paint failure is rarely mysterious.

    In our experience, it tends to happen exactly where preparation, moisture control, repairs, or material quality were compromised.

    That is why the best questions to ask an exterior painter aren’t designed to make the hiring process complicated.

    They’re designed to help you understand what you’re actually buying.

    Before signing, make sure you know who is doing the work, how the home will be prepared, what exact materials will be used, how many coats you’re receiving, how unexpected repairs will be handled, what the warranty covers, and whether every important promise appears in writing.

    Because when it comes to exterior painting, the work you cannot see once the final coat goes on is often what determines how long the paint job lasts.

    Our own interior and exterior painting service includes the surface preparation and repair work these questions are designed to uncover. If you want a sense of the range before you collect bids, our exterior house painting cost guide gives typical whole-house figures for Los Angeles.

    Sources

    • CSLB Industry Bulletin, Progress Payment Restrictions — the down payment on a home improvement contract “may not exceed $1,000 or 10 percent of the contract price, whichever is less.” The bulletin cites Business and Professions Code sections 7159 and 7159.5.
    • CSLB, Check a License — where to look up a license number, its status and classification, and whether the bond and workers’ compensation coverage are current.

    Get a written exterior painting estimate

    We will walk the site, confirm what your city requires, and send an itemized written proposal with every allowance named. The site visit and the estimate are free.

Call Free Estimate